

How to Winterize Your RV (it’s easier than you think)
Follow along to learn the steps to winterize your RV. If the idea of winterizing your camper sounds daunting don’t worry. Even if it’s your first time you should be able to complete this process in about an hour as long as you have a plan and the right equipment (we’ll get to that soon).
Can you winterize your RV yourself?
Sure, if you bought you camper at a dealer they might have included the first year’s winterization for free. This is a great way for them to get you in the habit of taking it in every year, but that doesn’t mean you can’t do it yourself. You’ve probably already picked up several tips and tricks since you got your RV. This isn’t any different there isn’t any magic or expensive specialized tools need, you just need a little time and a couple parts that you can order from Amazon or pickup at you local Walmart.
I created a great checklist that walks you through all the equipment and steps you need to follow to protect your RV from freezing
Click Here to Get the Checklist
How long does it take?
I would plan to spend most of a day to get your travel trailer or 5th wheel ready for winter, but that includes several other tasks that I suggest doing so your camper will be ready to go in the spring.
If we’re just talking about the water system, then I can have my camper winterized in about 30 min. Your first time might take a little longer because you will have to find the valves and drains, but even a beginner should be able to get it done in about an hour.
What supplies and equipment do you need to winterize an RV?
You probably have most of the items you will need, but there are a few special tools required. Here is a complete list of everything I use (with links to Amazon in case you don’t have everything already).
- RV Antifreeze
- Winterizing Kit (this might already be built into your RV)
- Blow-Out Adapter
- Air Compressor
- Water Heater Drain Socket
Use antifreeze, blow-out the lines or both?
If you have done any searching for tips to winterize your RV, you have probably come across a debate about how to do it.
I do both. I would rather spend a little more time in the fall than repair a broken line in the spring.
When I winterize a camper, I blow the air out of the lines first and then fill them with antifreeze. I store my camper outdoors in the Ohio winter and temperatures drop below freezing for weeks at a time. If you live in a milder climate where the temperatures are above freezing for most of the winter. You could consider only 1 of the 2 methods.
If I had to pick 1 I would skip blowing-out the lines and use antifreeze only. That is because the antifreeze displaces the water and any remaining water will be diluted to a point where damage from freezing is unlikely.
Step-by-Step RV Winterizing Process
I use a 4-step process to protect the water lines in my RV from freezing.
- Empty the holding tanks
- Drain the water
- Blow the lines out with compressed air
- Fill the lines with antifreeze
Step 1: Emptying the tanks
If you don’t have a way to dump your waste tanks at home, you will have to start this step when you leave the campground for your last trip of the season.
Take a little extra time when dumping your tanks to make sure you have all the water drained out. If you have a tank flush system then use it to get your black tank as clean as possible.
Step 2: Drain the Water
The next step is to remove as much water as you can.
There are 3 locations to drain the system:
- Fresh water tank drain
- Low point drains x2 (hot and cold)
- Water heater
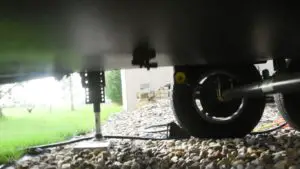
Locating the drains
The easiest way to locate your drains is to look at the bottom of your camper. If you see a plastic water line sticking out it is probably a drain line. They might have a cap or valve, or just be a piece of tubing with nothing on it.
The fresh water tank drain is usually located directly below the tank. The low point drains for your water lines could be anywhere. If you don’t see them right away just keep looking.
How to open the drains
If you have a plain tube sticking out there is most likely a valve inside the RV directly above it. You might have to remove an access panel or reach into the back of a cabinet to find the valve.
If you have a valve or cap below the camper just remove the cap or open the valve and water should begin flowing. If it doesn’t look inside for a second valve.
To help your system to drain a little better open a few faucets in your camper so you don’t get a vacuum lock that prevents the water from draining.
Purge the water pump
While you are draining the system purge any water from your water pump and the line that connects it to the water tank. Once the fresh water tank is empty and while the drain valves are still open just turn your pump on for a few seconds. You don’t want to let your pump run dry for too long, so once you hear the change in sound shut it off.
Draining the water heater
While the water is emptying from the drains below your RV locate the water heater. At the bottom of the water heater will be a large hex plug. Click here to get the right size socket on Amazon if you don’t already have one.
Usually the heaters anode rod will be attached to the plug. Remove the plug and inspect the anode rod. Make sure you stand off to the side when removing the plug, unless you want to wash your feet. If the anode rod is more than ¾ gone then you should replace it. If you want to drain the heater faster pull the pressure relief valve to allow air to enter the top of the tank (I know the valve isn’t designed for that, but once a year won’t hurt the valve).
After all the water has been drained close any open fixtures and drains. If you’re going to blow the lines out just leave the drain plug out for now. If you aren’t going to blow the lines out then put a couple wraps of Teflon tape on the water heater plug and re-install it.
Step 3: Blow the lines out
Now that most of the water has been removed you can force the remaining water out with compressed air.
You will connect the air compressor to the city water port on your RV. To do this you will have to get a garden hose to quick disconnect fitting. If you don’t need it today, Camco makes an adapter that is available on Amazon Click here to see it. The other option is to head to your local hardware store and build the adapter yourself. You will need 2 parts, a garden hose to ¼” female NPT adapter and a ¼” male NPT to male quick disconnect adapter.
Now, you need to adjust the regulator on your air compressor before connecting it to your RV. The water system is designed for low pressures around 50 psi. If you apply 90 psi air pressure you will damage some of the fixtures or fittings.
Set the air pressure to 40 PSI or less to avoid damaging the system.

Even 20 PSI is enough pressure to force the remaining water out of the system without having to worry about damaging anything.
Connect the air compressor and turn it on. Since we left the hot water tank drain out any remaining water in the lines connected to it will be blown out. Let that run for a few seconds and then turn the air compressor off and reinstall the drain plug.
Turn the air back on. Once the system is pressurized open the low point drains back up one at a time (hot and cold). Leave each open until only air comes out.
Finally go from fixture to fixture and repeat the process of blowing the water out of both the hot and cold lines.
Additional lines to blow out
There are a few more lines you should blow out before putting the compressor away. These lines may not get filled with antifreeze, so blowing them out is important
- Water selector valve – If you have a selector valve that allows you to fill your fresh water tank from the city water connection you will want to blow that line out too. Just relieve any pressure in the line first and then rotate the valve to the tank fill position and run the compressor for about 30 seconds to clear any water.
- Tank flush lines – If your camper is equipped with a tank flush valve connect the adapter to it and let the compressor run for a couple seconds. You may want to crack the drain valve or have someone open the toilet to prevent pressurizing the tank.
Step 4: Fill the lines with antifreeze
This is the last step to make sure you are protected from freezing. Any water that wasn’t already removed will be forced out by the antifreeze or diluted enough to prevent freezing.
Before pumping the antifreeze in there are a few more things to do.
- Remove any inline water filters and bypass them if possible
- Bypass your hot water tank
Bypassing the water heater
This redirects the cold water line that goes to the hot water tank directly to the hot water line on the outlet of the tank. You don’t want to use 6 – 10 gallons of antifreeze filling up the hot water tank.
The bypass valve will usually be in one of 2 places. Most commonly it is 1, 2 or 3 valves attached near the back of the tank. Just locate your water heater and then go inside and look for an access panel that can be removed to get to it. You will probably need a screwdriver to remove the panel.
If you see 3 lines connected to a single valve, then you have a 1-valve bypass system. If you see separate valves on the hot and cold lines and a 3rd valve on a short line between the hot and cold then you have a 3-valve system. Turn each valve 90 degrees to bypass the heater. Some systems may not have a valve on the hot line out of the tank. This is because there is already a check valve that prevents water from flowing backwards into the water heater.
How to add the antifreeze
You will add antifreeze using 1 of 3 methods from easiest to hardest.
- Select the winterize or sanitize mode on your water valve and use the city water port.
- Connect to a winterizing kit installed near the water pump.
- Use a hand pump connected to the city water port.
Selector Valves
Many higher end and luxury RV’s have selector valves installed at the factory. My Cougar 5th wheel didn’t have a selector valve or winterizing kit. So I installed a water selector valve to make winterizing and sanitizing the system easier. This does requires some plumbing so if you aren’t comfortable working with your RV’s water lines this probably isn’t the option for you.
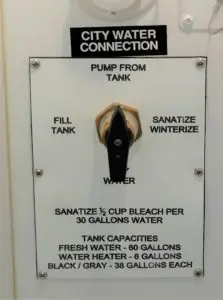
The valve I used is the Anderson Brass Co. 4 function fill valve PN 200RV-4. This valve has 4 positions, city water, winterize, fill tank and pump from tank. With this option just connect a hose to your city water port and put the other end in a jug of antifreeze. I recommend cutting the end off of an old hose so it reaches the ground with a little extra.
Winterizing Kits
A winterizing kit is the second easiest to use. Some RV’s come from the factory with this kit already installed, but even if your’s doesn’t it is an easy DIY project. I installed this Camco kit on my first camper and the install only took about 15min. The winterizing kit is installed on the line that connects your fresh water tank to the water pump. Like the water heater bypass this is usually located behind and access panel. I’m sure you have heard your water pump running, so just look for a panel near that area.
Winterizing kits consist of a valve and a hose. To use this simply attach the hose to the open port on the kit and then flip the valve to the winterize position. This will your RV’s water pump to suck the antifreeze through the system.

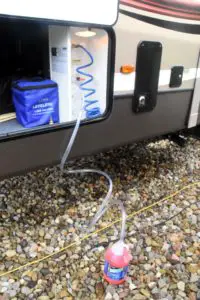
Winterizing Hand Pumps
This is the “Manual labor” method. A hand pump like this one from Valterra is connected to the city water port on your trailer and then a second hose goes from the pump to the antifreeze jug. In the first 2 methods the water pump pushes the antifreeze through the system in this one you do the work.
Antifreeze process
Once you have your antifreeze jug connected, open a fixture and turn the pump on. Leave that fixture open until you have a steady stream of antifreeze, do this for hot and cold. Repeat this process for all the fixtures. Make sure to remember the toilet(s) and any outside sinks and showers. If you have a dishwasher or wash/dryer refer to the owner’s manual.
If antifreeze stops flowing the jug is probably empty. Turn the pump off, change jugs and turn the pump back on.
Once all the lines are filled take the remaining antifreeze and pour some down each drain. Make sure to get some antifreeze in each drain so any water in the trap won’t freeze.
A few more things to do before winter
There are a couple other things to do with your RV before winter to ensure it is ready to go in the spring.
Remove all food and do a deep clean
Your camper is already a tempting place for mice to call home for the winter. Don’t send them an invitation by leaving food or crumbs from those s’mores you ate on your last trip. Take the time to remove any food you have left over and clean out all the cabinets and drawers. For what it’s worth, I have also heard dryer sheets will deter mice. I usually pickup a cheap box and spread them around.
Clean and seal the exterior
The exterior of your RV takes a lot of abuse during the year and needs a little attention before winter storage.
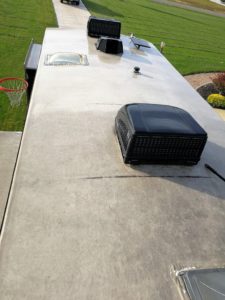
Start at the top (roof)
One area the is usually neglected is the rubber roof of your RV. After a full summer of parking under trees, road grime, and the sun baking it, your roof needs some work.
I use a 3 step process.
- Clean with Dicor Rubber Roof Cleaner
- Repair lap sealant with Dicor Self Leveling Lap Sealant
- Seal with Dicor Roof-Guard
The cleaning process is pretty self-explanatory. Scrub it with a soft brush and the cleaner and then rinse with clean water. To avoid black steaks that make your RV look like a zebra, make sure you rinse the sides off too. You will be surprised by how dirty the roof is, check out this picture of how mine looked.
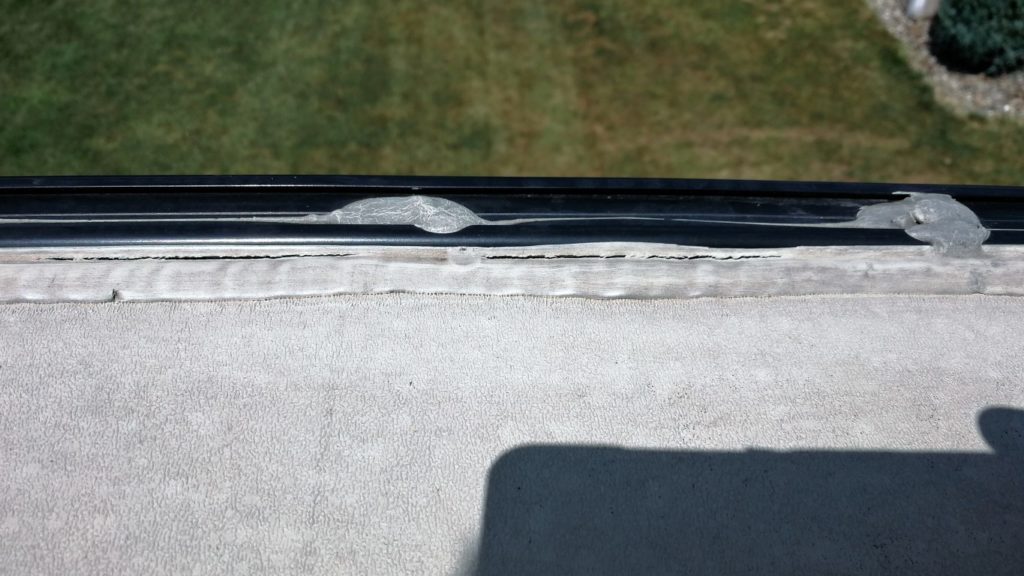
Next, look for any cracks or missing lap sealant around all of the protrusions in your roof. Anywhere you see something that looks questionable add some self-leveling lap sealant. The self-leveling sealant will flatten out and flow into the cracks to create a good seal. If you lay down a nice bead it will look wider and flatter after a couple of minutes. Water damage is one of the most common problems for RV’s. Touching up the lap sealant is a great way to prevent water from getting in.

The last step is to seal and protect your RV’s Roof. Roof-Guard is designed to help keep the rubber clean and protect it from the sun.
Now the sides
The walls or your RV need a good cleaning and sealing too. Give your camper a good wash and wax. For this step just use your favorite RV or car wash and a wax the is easy to apply. Campers have a lot of surface so you don’t want a wax that takes a lot of buffing.
You did it! That wasn’t too bad right?
When winter is over be sure to check out this article to de-winterize your camper and get ready for spring.
Leave a comment below if you winterized your RV for the first time and let me know how it went.
Thanks for reading and enjoy your weekend RV adventures.
Jason
Pingback: 24 Of The Best Camping Blogs That You Should Be Following - Beyond The Tent
You put together a great list of camping blogs and I’m honored to be on there. I am going to start following some of your other recommendations.
Thanks,
Jason
Living in a recreational vehicle or camper during the cold winter months poses unique challenges for even the most experienced outdoor hobbyist. To ensure that your winter camping is very safe and relaxing, you will need to prepare your RV to ensure that it is all set for the cold weather. A coat of RV Roof Magic on the surface of the RV roof is one of the best and simplest preventative measures you can do.
Sounds like good suggestion. Please reach out via email, I would like to learn more about Roof Magic.
Thanks,
Jason
My wife and I live in Wisconsin and recently purchased our first travel trailer. We bought it second hand and the seller had not winterized it yet. We used to go camping when our kids were little but they are all adults now. All we ever had before were pop-up campers and we never used the water systems in them. I did some research via the Internet and came across your blog. This being my first go around with winterizing a large camper it took me a bit longer. Wanted to make sure I didn’t miss anything or screw anything up. Thank you for your blog. I followed it step by step and got through it without any problems.
Ron, thanks. I love knowing that I helped someone else out. If you have any questions please reach out.
Jason
Pingback: How to Winterize Your RV - Scott Warriner, RV Service Pro