
Did you upgrade your camper’s tires to a higher load range? Maybe the tire information sticker on your RV has become unreadable or is missing. Maybe you just want to be sure you are getting the best performance out of your tires. Whatever your reason for searching is, you have come to the right place.
Most RV tires should be filled between 40 and 80 PSI. The exact pressure depends on the load range of your tires and how much weight the RV is carrying. There are 3 methods to determine the correct tire pressure:
- Use the Max pressure found on the tire’s sidewall.
- Use the values on your RV’s tire information sticker.
- Calculate the pressure using your RV’s axle weight and tire load charts.
If you’re like me you have always been taught to fill your tires to the pressure listed on the tire, or to check the stick on your door jam or owner’s manual for the proper pressure. For your average car this is great. The thing about cars is their weight doesn’t change much. Sure, you might fill the trunk after a trip to the home improvement store, or load up the family up to go somewhere, but that’s nothing compared to the thousands of pounds of cargo some RVs can handle.
Why is the proper tire pressure important? Rather than take my word for it, here is a quote from Michelin’s RV Tire Guide.
“An underinflated or overloaded tire will build up more heat that could go beyond the endurance limits of the rubber, steel belts, and radial cords. This could cause sudden tire failure.
Underinflation will cause poor handling, faster and/or irregular tire wear, and a reduction in fuel economy.
Overinflation, on the other hand, will reduce the tire’s contact area with the road surface, which reduces traction, braking ability, and handling. A tire that is overinflated for the weight it is carrying is more prone to a harsh ride, uneven tire wear, and impact damage.”
Now let’s take a look at each method and see how and when each of them should be used.
Method 1: Setting your RV’s Tire Pressure to the Max Pressure found on the Sidewall
This method is the safest option if you aren’t sure what to do. The tires are rated for maximum capacity at the pressure embossed into the sidewall. Assuming your tires are a high enough load range for your RV (and everything you have loaded in it), inflating the tires to this value will ensure your tires can carry the weight.
One other reason to use this method is that some tire manufacturers will only warranty tires that are operated at max pressure. Carlisle is one of these manufacturers.
Trailer tire pressures correspond with the load rating. Trailer tires identify the load range using a letter system. Most travel trailer and 5th wheels tires fall between range B and E. As you move up in load range the carrying capacity of the tire increases as does the maximum inflation pressure. The table below lists these load ranges, pressures, and ply ratings. If you’re wonder what ply means, it’s basically a layer, and traditionally the way to make a tire stronger was to add more layers of rubber and fabric to the sidewall. The ply ratings can be confusing because this is not necessarily the number of plys in a modern tire. The ply rating represents the strength of the tire compared to early bias ply tires, modern tires are much stronger and even load range E tires may only have a 2 plys.
Tire Load Range Pressure and Ply Rating Chart
| Load Range | Max Pressure | Ply Rating |
| A | 2 | |
| B | 36 PSI | 4 |
| C | 50 PSI | 6 |
| D | 65 PSI | 8 |
| E | 80 PSI | 10 |
| F | 95 PSI | 12 |
| G * | 110 PSI | 14 |
| H * | 125 PSI | 16 |
| J * | 130 PSI | 18 |
| L * | 20 | |
| M * | 22 | |
| N * | 24 |
* Load Ranges above F are mostly used on commercial vehicles not RVs.
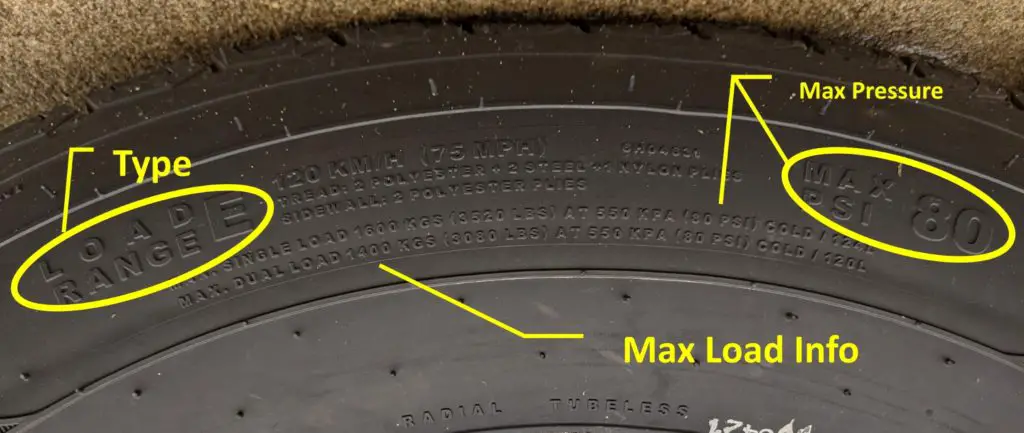
You can find the load range and max inflation pressure on the sidewall of the tire.
Method 2: Using your RV’s Tire Information Sticker to Set the Pressure
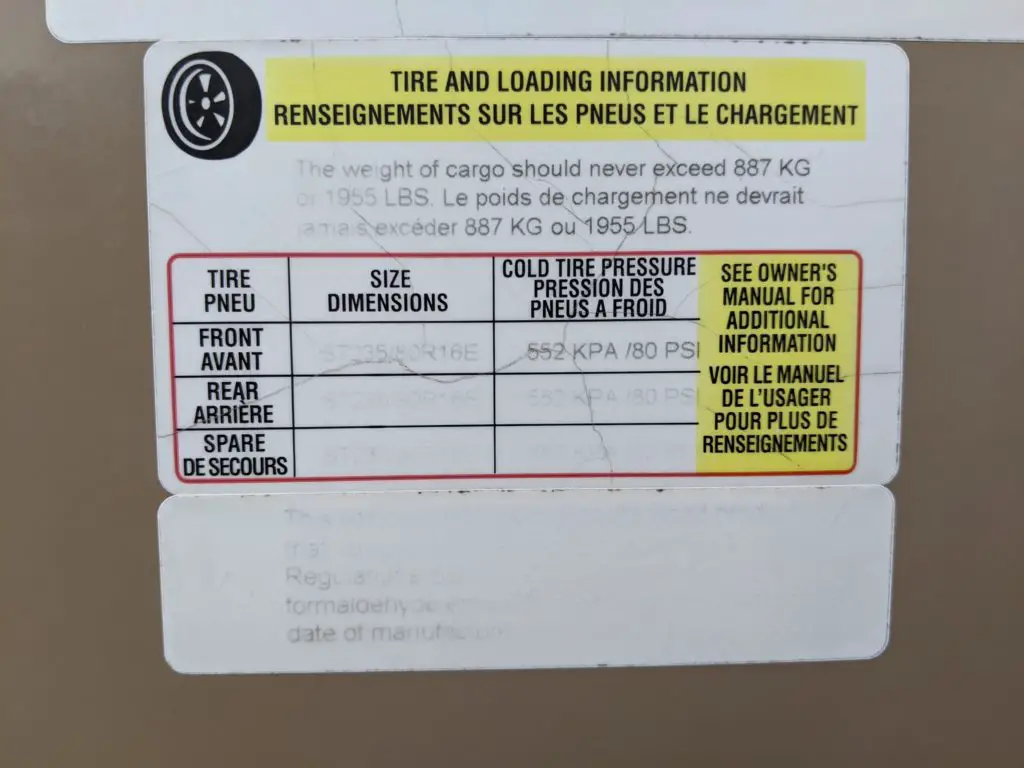
When RV manufactures design a travel trailer or 5th wheel they specify a maximum weight that includes the equipment they put in the RV and all the cargo, water and waste that you will add, this is known as the GVWR or Gross Vehicle Weight Rating. This maximum weight is usually carried by 1, 2 or 3 axles or 2, 4 or 6 tires. The RV manufacturer also selects the tires that it will put on the RV.
Based on that maximum weight and tire selection the manufacturer will determine the recommended tire pressure. Most of the time this tire pressure will match the max pressure on the sidewall that we discussed in method 1.
Like Method 1 this will provide you with a safe tire pressure capable of carrying your RV down the road. Also, like method 1 this might not be the optimal pressure for the most comfortable ride and tire wear. Another potential problem with this method is that if you replaced the factory tires with new ones that have a higher load range, you may be under inflating them.
Warning: You should always check the max pressure on the tire and make sure the sticker value does not exceed the tire rating. If incorrect tires were installed on the trailer you could overinflate them causing a dangerous situation. If you find this is the case your tires need replaced with properly rated ones.
Method 3: Calculating the Correct Tire Pressure using Actual Axle Weights and Tire Load Charts (The Preferred Method)
This method has been championed by Robert Marble of RVTireSafety.com. Robert retired from a 40-year career as a tire engineer and now writes and speaks about tire safety. This method requires the most “work” on your part but gives you the best performance from your RV’s tires.
I recommend only following this method for Load Range D or higher. In my opinion the lower load ranges simply don’t have enough variation in pressure and capacity to be worth the effort.
Before we look at the steps involved in this method let’s look at how Tire Load Charts work. Load charts are created by tire manufacturers and are unique for each model and size of tire they make. These charts are continuously updated and reviewed to provide you with the optimum pressure.
Charts vary from manufacturer to manufacturer, but at a minimum, they all list the tire, load and inflation pressure for single and dual wheels (dualy).
Warning: It is important to note that regardless of the difference from side to side all tires on the same axle should be inflated to the same pressure. Inflating tires to different pressures on the same axle will reduce the handling and stability of the vehicle.
Step 1: Weigh Your RV
Weigh your RV and tow vehicle. You will need to find a scale to weigh your trailer. If you aren’t sure where to find a scale, try searching for CAT scales in your area. You can find scales at some truck stops, or stores that sell things like dirt, sand and gravel by the truck load.
You should load your RV with everything you will take camping with you, including fresh water. Having your tow vehicle weight isn’t absolutely necessary, but it is good information to have. If possible you should get the weight of your tow vehicle without the trailer, that will allow you to check the tongue or pin weight of your rv and make sure you are within the payload rating of your vehicle.
Here are the weights you should get for towed RVs:
- Tow vehicle without trailer
- Tow vehicle with trailer
- All trailer axles
- 2nd axle (2nd and 3rd if triple)
- 3rd axle (if applicable)
Here are the weights for drivable RVs:
- Front axle of RV
- All axles
- Rear axle(s) (2nd and 3rd for tandem motorhomes)
- 3rd Axle only (for tandem axle motorhomes)
- Trailer weight (if towing a trailer)
Using these weights, you will be able to calculate the weight on each axle to use with the load charts and calculate the combined weight to ensure you are within the ratings of your vehicles.
Step 2: Add 10% for Safety and Lookup Weight in Load Charts
- Add 10% to the axle weight from step 1 to provide some margin of safety and to allow for extra weight you might add.
- Divide your new axle weights in half, this is your load per location.
- Find the load chart for your tires, below are links to several tire manufacturer’s websites to help.
- Find the next higher weight on the chart to determine the appropriate tire pressure. Make sure to use the appropriate values for single or dual wheels.
Links to Tire Load Charts
- Goodyear
- Michelin
- Bridgestone / Firestone
- Maxxis
- Carlisle (Only Warranty Tires Operated at Max Pressure)
Example: Finding Tire Pressure from Load Chart
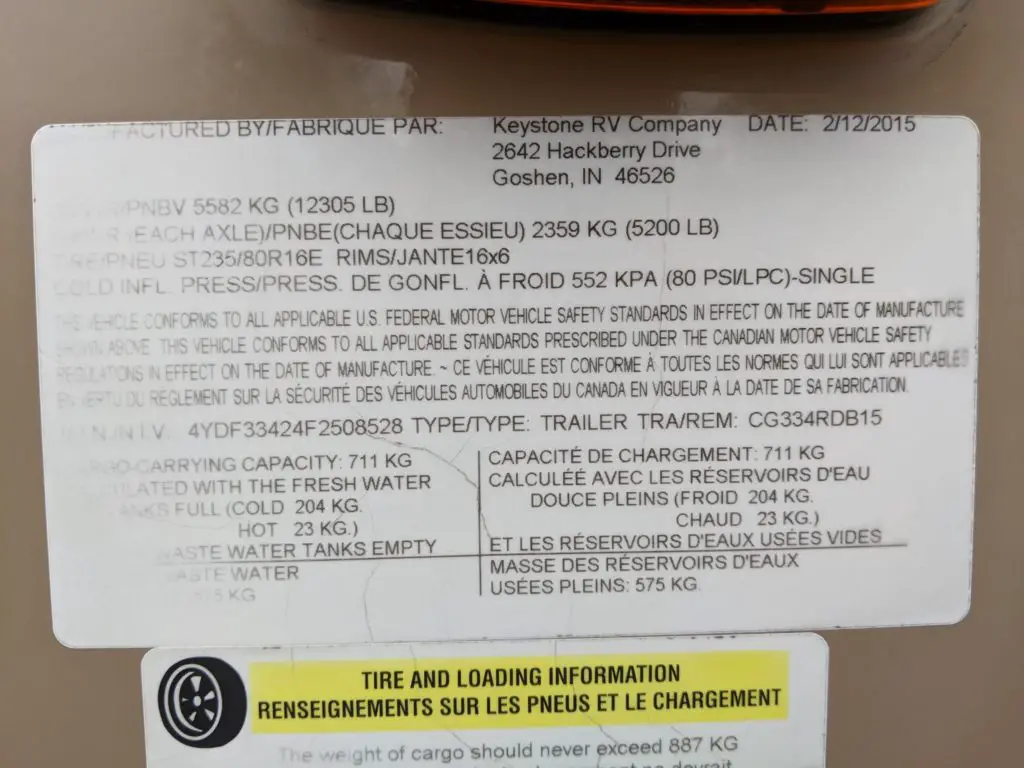
In this example we will use my truck and RV.
Truck: 2015 Ram 3500 Crew Cab Short bed with single rear wheels
RV: Cougar 334RDB 5th Wheel
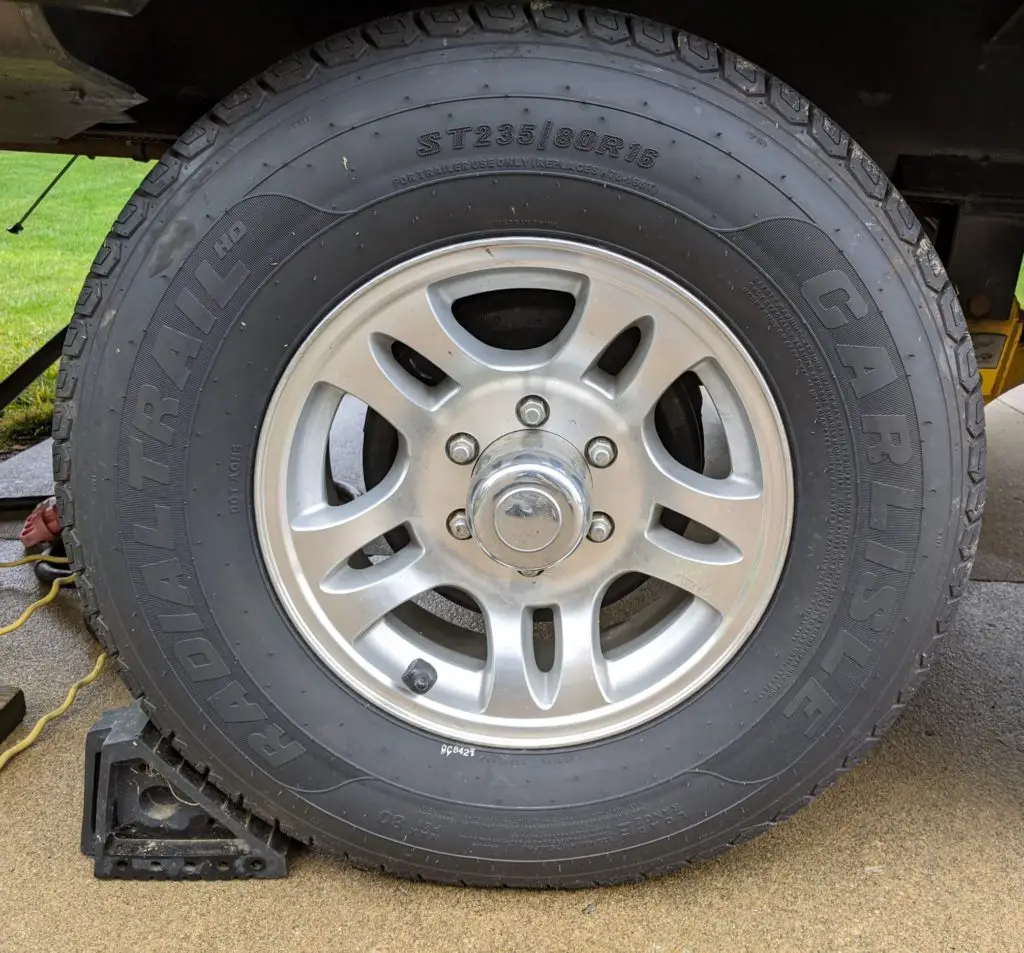
RV Tires: Carlisle Radial Trail HD ST235 / 80 R16 Load Range E
Weights:
- A: Truck without trailer – 8,660
- B: Truck with trailer – 11,059
- C: All trailer axles – 9,587
- D: 2nd axle – 4,778
Calculations:
- B – A = Pin Weight = 2,399
- Pin Weight + C = Gross Trailer Weight = 11,986
- C – D = 1st Axle Weight =4,809
Now that we have both axle weights add 10% to each for the safety margin and divide in half to get the load on each tire.
- Axle 1 + 10% = 5,290 / 2 = 2,645
- Axle 2 + 10% = 5,256 / 2 = 2,628
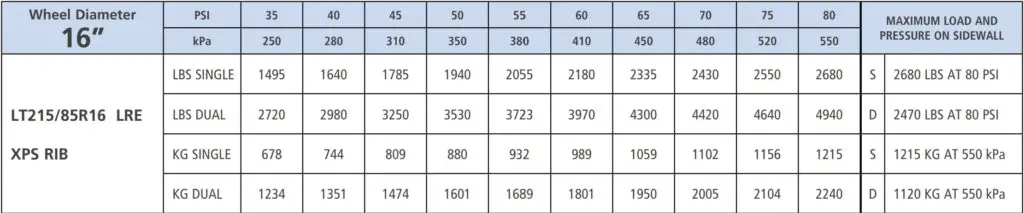
Reading the Tire Load Chart:
Based on the Load / Inflation Chart below both axles should be set to 55 PSI.
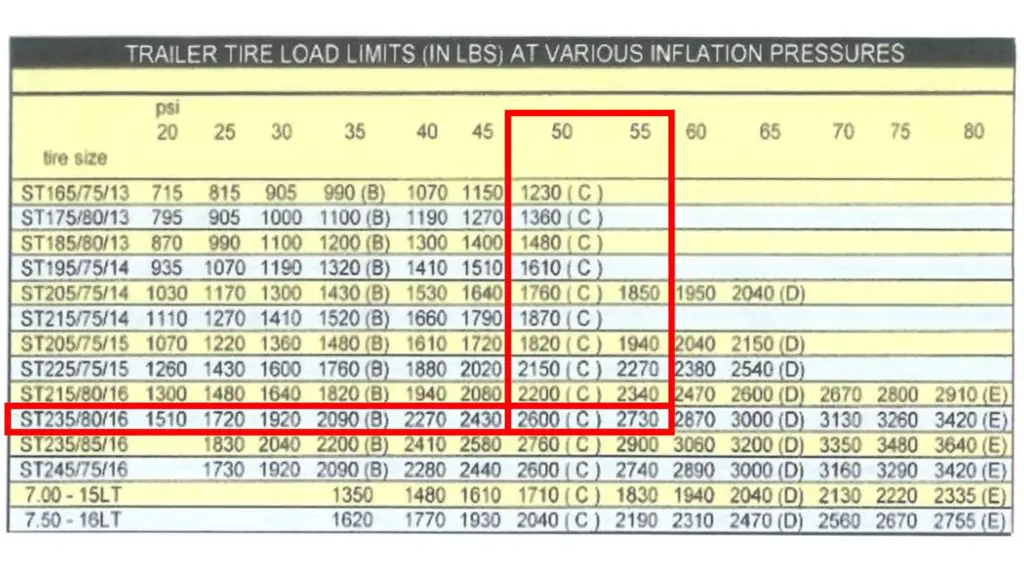
At 50 PSI the tire can only carry 2,600 lbs so that is not enough, but 55 PSI can carry 2,730.
As I mentioned above, Carlisle only warranties tires operated at Max Pressure, so I continue to run my tires at 80 PSI. They only provide the load tables to show the relationship between pressure and load capacity.
How Read a Tire’s Sidewall Markings
All 3 methods require you to read and understand the information on your tire’s sidewall. Below is a quick explanation of some of the markings you will find on a trailer tire and what they mean.
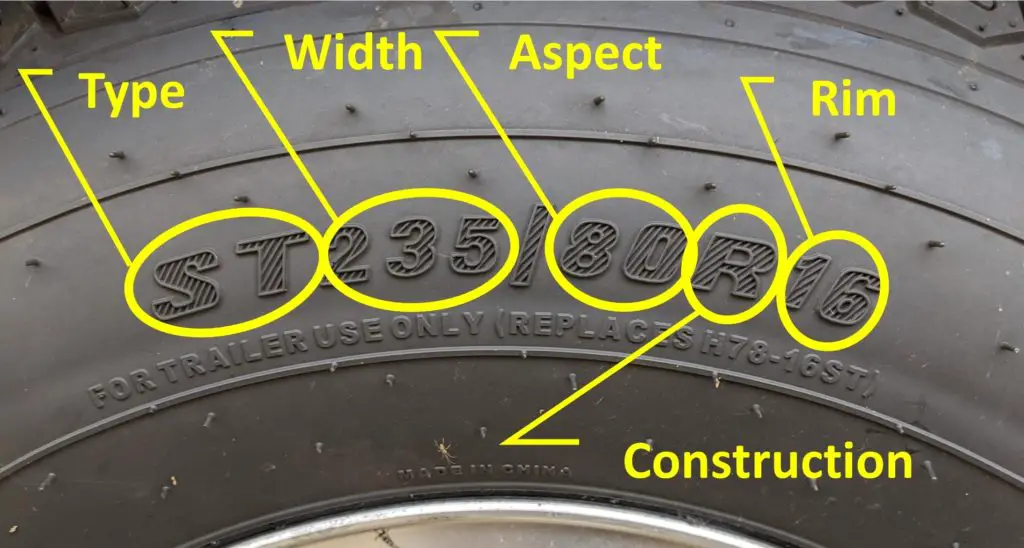
Tire Type: P- Passenger, LT- Light Truck, ST- Special Trailer, T-Temporary
Tire Width: the approximate width from sidewall to sidewall in millimeters
Aspect Ratio: The ratio of sidewall height to tire width, for example a 60 means that the sidewall height is 60% of the tire width
Construction: R- Radial, B- Bias Ply
Rim: Diameter of Rim in inches
Maintaining Your Tire Pressure
One more thing to keep in mind. After you have your tires set to the proper pressure you need to make sure you keep them there. One option is the check the pressure in each tire before every trip you take. This will ensure you are always getting the best performance and life out of your RV’s tires.
An easier solution is to use a Tire Pressure Monitoring System (TPMS) with your RV. All modern cars and light trucks come with tire pressure sensors installed in the rims to keep you safe, so using the same technology on your RV makes sense. To add a TPMS to your RV you don’t have to install sensors in your tires, all you have to do is remove the caps from your valve stems and screw on a small battery powered sensor. A monitor wireless monitor in your cab displays the tire pressures and will alarm you to a sudden loss of pressure. Top of the line systems also monitor temperature and alert you if that gets too high. If you want more information on RV Tire Pressure Monitoring Systems click this link.
Wrap Up
The bottom line is that no matter which method you choose, the most important thing to do is make sure you keep your tires inflated to that pressure and you shouldn’t have any unexpected problems.
Many people talk bad about “China Bombs” Chinese made tires. On the other hand there are plenty of people who have used Chinese tires for years and haven’t hand any issues. The key to long tire life is keeping them properly inflated and within their speed ratings. Excessive speed can cause excessive heat leading to tire failure.
Thanks for reading, please share this article if you found it useful.
Jason
Hi Jason,
We have a Grand Design 5th Wheel and recently had to replace the Westlakes 10ply they came with. We upgraded to Hercules 14ply tires. The issue is we are trying to understand what pressure we should be starting out with in the mornings running these. The tire wall is 110psi, the trailer sticker shows 80psi. We did go with the higher ply as we read another blogger advising to cover the GVWR plus 20% and the 10plys just really didn’t do that. So now what? Do we inflate the tires to the max on the tire, that is 110, or keep them inflated at only 80psi? The installer inflated them to 80 when they put them on.