
RV Full Hookups with Dual Sewer Hoses – How To
Does your RV have 2 sewer connections? Do you know the best way to connect them at a full hookup campsite? The key to connecting 2 sewer hoses at once is the Y-Connector. I have been using the Rhino Sewer Y-Connector. This makes it possible to connect all of my waste tanks to the sewer at the same time instead of moving 1 sewer hose back and forth.
Now that you have the quick answer I’ll share my full setup with you and a few more tips for your sewer system. Even if you only have 1 sewer connection on your RV you will still find some useful information here so keep on reading.
Why does your RV need 2 sewer hoses?
If your RV has more than one bathroom, there’s a good chance it also has 2 sewer connections. This is because RV manufacturers like to locate the black tank directly below the toilet (I’m sure you can figure out why). If you have 2 toilets the only way to do this is to install 2 black tanks. This usually results in having 2 gray tanks as well. In my RV, the kitchen and rear bathroom sink share a gray tank. In the front, the main bathroom sink, and shower share a gray tank. Each bathroom also has its own black tank.
Having dual sewer connections can be useful when you are boondocking or staying at a water / electric site because you likely have 2x the capacity of a comparable RV with only 1 sewer dump connection.
Tips for Full Hookup Sewer Connections
The following tips will apply for any RV whether you have 1, 2 or more sewer connections.
Necessary Equipment
Obviously, you need a sewer hose, but there are a few other items you should have to keep everything flowing smoothly if you know what I mean.
- Sewer Hose Support – You could just let your sewer hose lay on the ground, but if the sewer hose connection at your campsite is uphill or sticking out of the ground your hose won’t drain. Sewer hose supports are relatively inexpensive and make it easy to get everything sloped downhill.
To use the support just set it out on the ground with the tall end at your camper’s sewer connection and stretch it out until the short end reaches the sewer drain in the ground. Then set your hose on top.
- 4-in-1 Sewer Adapter – This part creates a sealed connection between your sewer hose and the connection at the campsite. Some sewer hoses like the Rhino Flex, include this adapter as part of the hose. For other hoses you will need to purchase it separately. The adapter has several different threads to connect to different size drains on one end and a sewer hose connection on the other end. This will keep the nasty sewer odor contained, because no one wants to smell that when sitting around a campfire.
After your connected you will need to dump your tanks. For more tips on how that is done read this article.
What else do you need for an RV with 2 sewer connections?
Technically nothing, for the first year I had my 5th wheel I would move the sewer hose back and forth between the 2 dump locations every time I needed to empty the tanks. This got old fast, the last thing I wanted to do while camping was play with a sewer hose every day or two. For 1 night stays I still do it this way, but if I’m staying longer I have a better solution.
Connecting both sewer hoses at the same time
If you want to connect both hoses, you need a few more things.
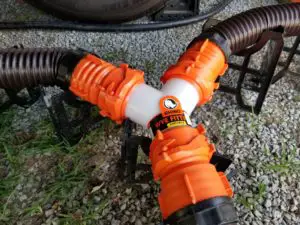
- Y-Adapter – This is the key to getting everything connected. An RV sewer Y-Adapter (or Wye-Fitting) connects 3 sewer hoses together.
- 2nd Sewer Hose – This gets your second RV connection to the Wye
- 2nd Sewer Hose Support – Most likely you will need an second hose support for the additional sewer hose. I have 1 long support that is was able to separate into 3 sections so I can move them around depending on the layout of the campsite
- 3rd Sewer Hose or 4-in-1 Elbow – Lastly you need to get from the Y-adapter to the hole in the ground. I carry both parts with me. If the campsite drain is in between the 2 dump connections on my camper I adjust the hoses so that the Y-Adapter is next to the drain and use the elbow to make the connection. If the drain is close to either the front or back or if it’s farther away, I connect a sewer hose to the outlet side of the Y-Adapter and run that to the drain.
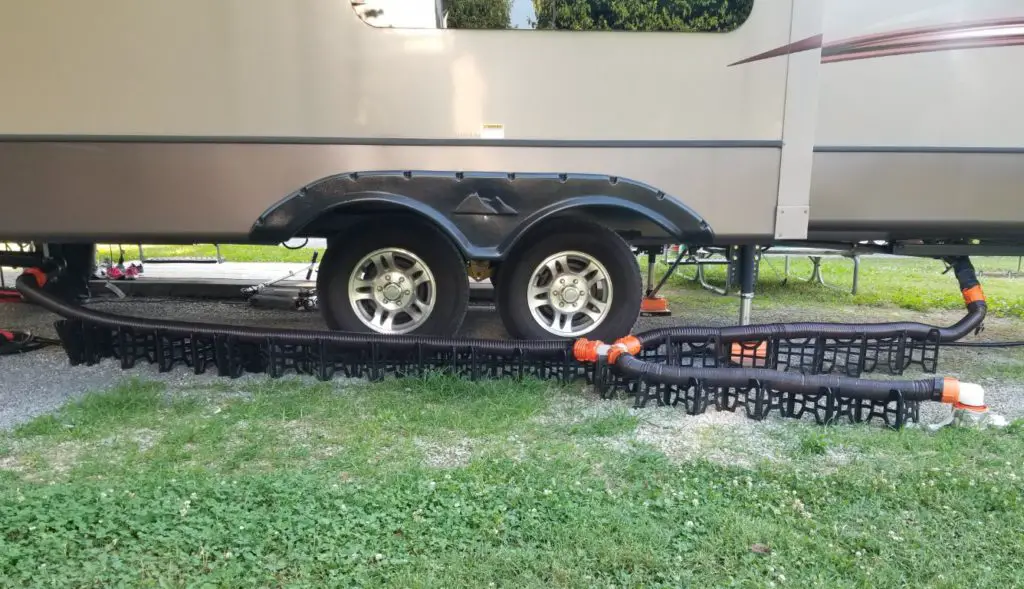
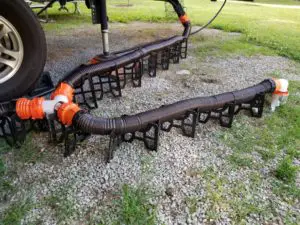
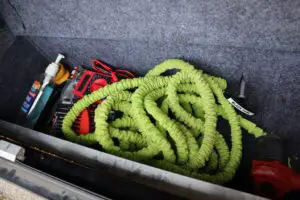
The picture below shows my typical setup It includes all the parts listed in the 2 sections above. In this case I used the 3rd sewer hose.
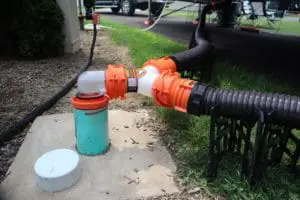
This picture shows the setup with the 4-in-1 Elbow attached directly to the Y-adapter
Here are links to all the products I use. If you purchase using the links below I receive a small commission at no extra cost to you.
- Sewer Hose (with built-in 4-in-1 elbow)
- Extension Hose (I have 2 of these)
- Sewer Y-Adapter
- 45 Degree Connector (I use this on my rear connection because of its position and angle)
- 4-in-1 Sewer Elbow
- Sewer Hose Support
You can also Click Here to see my Resource Page for some of the other gear I use.
Common RV Sewer and Waste Tank Questions and Answers
Here are a few more tips for your RV’s waste tanks.
Should I leave my camper’s dump valves open with full hookups?
Leaving the valves open seems convenient right? You will never have to worry about dumping your tanks, everything will naturally flow to the drain.
Leaving your gray tank valve open is usually fine, but don’t to this with the black tank. You need a decent amount of water to get all the solid waste out of your black tank. You also need water in the tank to allow that solid waste to bread down so it can flow more easily. If you are going to leave your gray tank open you should also avoid putting solids down the kitchen sink, otherwise you will have the same problem. Once solids dry in the tank they will be much harder to remove.
If you are camping for a few days, it’s fine to leave the gray tank open for a while. When your black tank starts to get over ¾ full, close the gray tank valve and let the sink and shower water build up. That way you will have “clean” water to flush your sewer hose with after dumping the black tank.
How do you flush an RV’s black tank?
Simply draining your RV’s black tank isn’t always enough to flush all solids out of the tank. This is where tank flush systems come in. One way to know you tank needs flushed is if your tank monitor reads full immediately after draining it. When it’s possible I flush my tank every time I empty it.
There are several ways to flush an RV’s tank.
- Tank mounted Sprayers – These are permanently installed in the black tank and have a garden hose connection somewhere on your RV.
- Spray Wands – Hand-held wand that is connected to a hose and inserted through your RV’s toilet.
- Dump Valve mounted sprayers- Attach to your sewer connection and have a garden hose fitting to flush water backwards into the tank.
Each of these systems works, but some are better than others. I prefer tank mounted sprayers over the other options. If you don’t have one of these, you can install it yourself. I did that on my last RV and it only took about 30 minutes to get the job done. I like the Camco Quickie Flush it doesn’t have any moving parts and sprays in all directions.
Wands like the Camco Flexible Swivel Stick also do a good job of cleaning your tank, but they are more of a hassle to use. You need a longer hose that will reach into you camper’s bathroom and then you must store the wand when you are done.
My least favorite is dump valve mounted sprayers. I would only consider versions that have a shutoff valve like the Valterra Flush King. The problem with this type is they don’t really spray into the tank, there are just too many twists and turns between the sewer connection and the tank itself. Using one with a valve you can fill your black tank in reverse and then drain it out. Repeating the process several times may remove most solids, but it just isn’t as effective as the other methods.
Should you use tank chemicals / toilet treatments
Yes. I use the TST Orange tank chemicals. Using a chemical in your black tank will reduce odor and help break down tissue and others solids in the tank. The “single serving” sized containers are easy to use, but I just get the 1 gallon size and pour a few ounces in after each “dump”. It can also be used on your gray tank if you start to develop an odor there, but I usually don’t.
3 More things you shouldn’t go without
These last 3 items aren’t directly involved in your sewer connection, but play an important role.
- Rubber Gloves – I keep a box of disposable rubber gloves in my storage compartment to use any time I am handling the sewer hoses or fittings.
- Hand Sanitizer – I keep this right next to the gloves just in case.
- Collapsible water Hose – I have a hose that that is used for flushing my black tanks. You should never use your drinking water hose for flushing your tanks, especially at dump stations where the water is usually non-potable. Click here to see the fresh water setup I use.
Wrap Up
Hopefully this article helped you understand a little more about how your RV’s sewer system works and how to hook it up. If you still have questions about how to do something or about any of the products I mentioned please leave them in the comments below. If you found this article helpful, can you help me out and share it on your favorite social media platform.
Looking for more tips, check out this page with over 100 tips for new RVers.
Thanks for reading and Happy Camping,
Jason
Hi Jason,
I’m Mike and my wife and I have owned over the years 3 different Class A diesel pusher motor homes at about 40 feet each. My wife the kids and I got into RVing many years ago but those were also our hard working days where we only had time to really go someplace about once a month. Now we are retired without kids and are going to buy a 5th wheel that also is about 40 foot long with several slide outs and live in it full time for a quite a while until we decide when and where we want settle down. It is going to be a bath and a half and I didn’t even think to see if they all have two black water drains and two grey water drains. So thanks for the education about how to best deal with them and what to look for while shopping around for one.
Thanks again,
Mike
Mike,
I hadn’t considered the sewer hookups until we were about to pickup our 5th wheel. I glad the article was helpful and good luck in your search.
Let me know if you have any questions I can help with.
Thanks,
Jason
my friends RV has 3 dump sections, so the ‘Y’ is great for the 2, but what about the 3rd gray tank that isn’t connected to the sewer?
Rena,
I thought I had it rough with 2 outlets to deal with. They could connect 2 “Y’s” and bring all 3 hoses together, but that’s a lot of hoses and fittings to carry around. If they aren’t staying in 1 place for a long time, I would probably just connect the 2 that need dumped most often and switch one of the hoses when the 3rd tank needs dumped.
Jason
I have a 31ft bumper hitch with the bedroom in the very back the kitchen area in the very front the bathroom is right in the middle 1 slide out super slide out and it has two sewer hookups to it I only want to use one will it drain the kitchen sink also
Howard, My guess is that the kitchen connects to the tank in the front and the bathroom sink and shower run the the rear hookup.
The best thing to do would be to hookup the front connection to a sewer and run some water in the kitchen with the valve open, then you will know for sure if that is the tank it’s connected to.
I hope that helps,
Jason
Can you tell me how long of a sewer hose I need for a 33 foot fifth wheeler with bathroom up front and one in rear? I need to get new ones and am not sure. Will 20 be ok for front? For rear 10 or 15. My camper is in storage at beach. Thanks!
Corlis,
I would suggest using a 15′ or 20′ for each. The reason is you never know if the sewer hookup at a campsite will be near the front, back or middle of the RV.
If you use a long hose for each that will give you the most flexibility to line things up.
Thanks for the question,
Jason
We have the same problem as Rena – three sewer connections. We used a Y to connect to the black/grey sewer outlet and the washer sewer outlet. We are using a garden hose connected to the galley sewer outlet to empty that tank. We figured that we really didn’t need the large sewer hose. We definitely need the larger sewer hoses for the washer gray tank and bathroom gray and black tanks. Two of our sewer outlets are under slides so it makes it hard to reach under and release them. You would think the manufacturer would have taken that into consideration.
Sometimes it seems like the manufacturers don’t consider how we will actually use our RV’s, doesn’t it?
Jason
Where am I supposed to store the Wye and other stuff that does not fit into my bumper storage? Even if rinsed its nasty stuff.Thanks
Derek,
I store it all in a 5 gallon bucket with a lid that I got from a home improvement store.
Jason
My 5th wheel has 2 sewer outlets, one in the rear, and the other midway. I was thinking of hard piping them together and only having one sewer outlet. I’ve tried googling this and cant find where anyone has done it. Do you think it would work?
I look for ways to tie mine together as well. My problem is I would have to go past the axles and there’s just not enough room to do it and keep all the clearances I need.
Hi Jason
I’m new to the camping world. I bought a use 2013 V-Lite Flagstaff with two bathrooms. So I have two black and two gray tanks. I’m at a permanent campsite. There is only one connection to the sewer. So I would have three lines coming out of the camera. Two sewer and one gray. How would you connect the lines into on sewer and would you keep black tanks close and then release every couple of days? Unfortunately our black tank Valves are under the slide outs. Thanks Wanda
If you don’t plan on moving the camper, I would try to connect them all together using PVC drain pipe. Then I would still keep the black valves closed until the tanks fill up. Otherwise you will end up with waste sticking and building up in the tank. You could look at adding electric or remote operated valves so you don’t have to crawl under the camper.
Thanks
Jason
I think I can top them all. I just purchased a Forest River 42QBQ and it has 4 separate drain locations for the tanks. I’m waiting until it’s delivered to my permanent site to figure out how I’m going to connect them all into my one sewer connection. Most likely will use PVC to connect at least some of the drains together and try to get down to 1 hose off the PVC into the sewer. Worst case may have to run 2 hoses into a Y at the sewer.