
I feel the need to coin some kind of phrase when it comes to RV toilets and tanks. Like “clean tanks, happy camper.” I’ll keep working on it. In the meantime, you’re here to learn more about emptying those dirty, dirty tanks full of yucky, yucky stuff.
The bad news? We gotta talk about poop. The good news? You won’t actually have to touch it if you do this right. So read on and learn the skills of the master poop-cleaner-uppers. (Sorry I said poop twice in one paragraph. Argh! Now it’s three times!) Moving on.
Where to Dump Your RV’s Tanks
No I’m not talking about going #2, I’m talking about after your tank is full of #2 and you need to figure out where to put it. You have two options:
- Designated RV dump site
- Fully serviced campsite
You CANNOT just empty your tanks wherever you feel like it. You must be at one of those two locations to take care of your “business.”
What holding tanks does you camper have?
So, on most RVs you will have three holding tanks that have different functions. But only two of these will need to be dumped on a regular basis. They are:
- Grey tank
- Black tank
The third is your freshwater tank, which you only need to fill and occasionally sanitize. For more about when and how to sanitize your fresh water tank, check out this article.
Maybe you can use your imagination, but I’ll go ahead and tell you the difference between the grey and black. The grey tank holds the drain water from your sink and shower. The black tank holds everything that comes from your toilet. Hence the name. Some larger RVs with multiple bathrooms may have 2 black or grey tanks.
When to Empty Your RV’s Tanks
Despite what you may think or what your instinct would be, you should not empty these tanks until they are mostly full. There needs to be enough water pressure to completely clean it out. Check out this article to learn why you shouldn’t leave your tank valves open. So how do you know when they are full? Well most RVs come with sensors that will let you know and you can keep an eye on the levels.
Other than that, you will want to empty your tanks before you get back out on the road. It obviously adds some extra weight and decreases your fuel economy.
How to Empty Your RV’s Tanks
Ok let’s get to the fun part! Knowing how to empty your tanks properly will make your life so much easier. I have also scoured the World Wide Web to make sure I found all the little tricks other campers have discovered about this nasty business. So here goes!
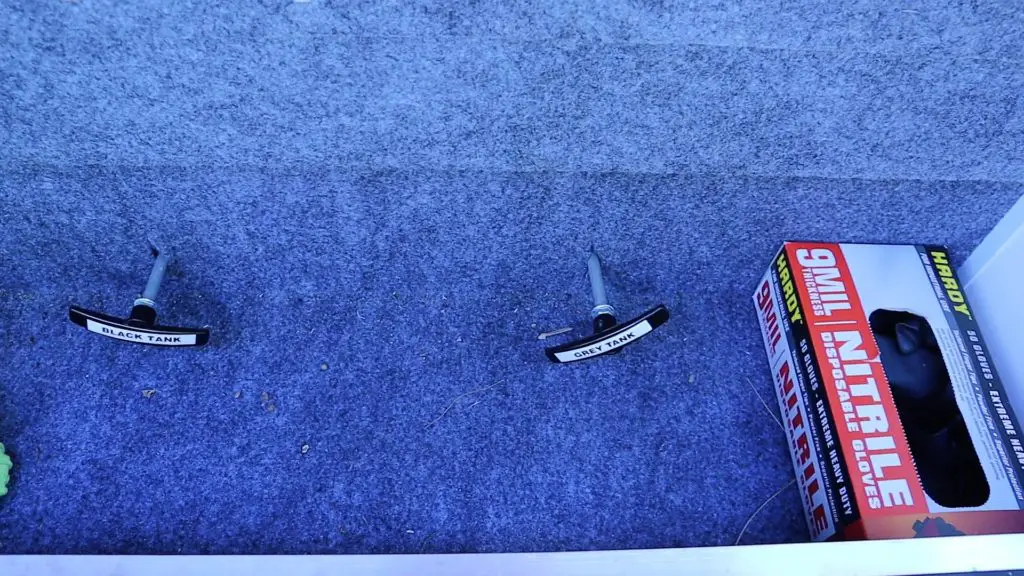
- ALWAYS drain your black tank first.
- You will actually use the gray water, which is surprisingly a bit cleaner and definitely less smelly, to rinse your hose of any leftover waste residue after you’ve emptied the black tank.
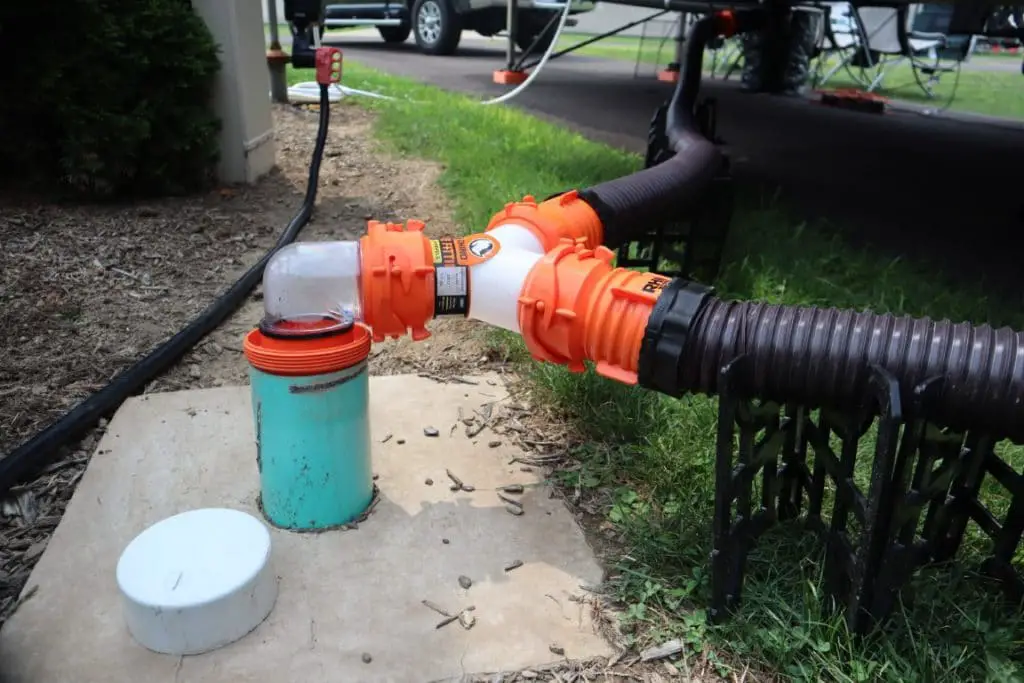
- Hook sewage hose (and adapter if needed) to the dumping station. Make sure everything is good and secure.
- Hook sewage hose to RV tank drain pipe.
- Pull safety valve (valve mounted near the hose connection), if you have one, after your hose is securely connected to the RV
- Pull the black tank gate valve.
- You should see or hear the tank begin to empty into the hose.
- Once it’s empty, you will want to back flush your black tank.
- There are a few options here on how to do that. But the idea is that your tank still has quite a bit of waste in it, even after you’ve emptied it, so you will definitely want to rinse it out.
- If you have it already installed, you will simply use the built-in flushing hose and simply turn on the water for that. Make sure to monitor how much water you put in, and be careful to not overfill. Just enough to rinse it out.
- If it’s not installed, you can purchase a hose designed for cleaning your tanks and use the water supply at your site.
- Close the black tank valve.
- Now that you have your black tank emptied and rinsed out, you will pull the grey tank valve open and let that water completely empty out as well.
- As mentioned, this will also accomplish rinsing your drain hose.
- Close grey valve. Double check all valves are closed, including your safety valve on the RV drain. And you are good to disconnect your hose and store it.
And it’s done! At the most, you could wear a pair of gloves, but otherwise it’s not that dirty of a job, except for what’s actually being transported through your hose…bleh.
How to Empty Tour Tanks Video
If you’re more of a visual person watch this video to learn about emptying your tanks.
Tips For Your Tanks
Do you have Multiple Tank Dump Locations?
Lastly, here a few things I picked up that other RVers have discovered helps with extra cleanliness.
Keeping Your Tanks Clean and Tank Level indicators working
There are 2 benefits to keeping your camper’s holding tanks clean. Things won’t build up and cause unpleasant odors and your level sensors will stay clean keeping your indicators working. Below are a couple tips to keep everything clean and working.
- Dish soap – every once in a while, squirt a little dish soap into your toilet and flush it into your tank. This helps loosen things up a bit on the sides.
- Bag of ice – another trick is to pour a bag of ice into your toilet right before you get on the road. The braking and turning will move the ice around in there and also has the effect of cleaning the sides of your tank. If you want combine this with the first method and add some dish soap and water for an even better clean.
- Holding tank chemical – once your tank is empty and you have a little bit of water in it, add your chemical of choice to the tank by pouring down the toilet as well. This will help break down what goes in there and also helps with smell. Most RV stores will have this or it can be purchased online. Check this out for everything you need to know about RV Tank Chemicals.
Wrap Up
It’s a nasty business, but somebody’s gotta do it. And that person is you…congratulations! But really, it should take you about 30 minutes to complete the job and then you’re good to go. Just remember black before gray, and rinse before you finish. As someone very wise once said – clean tanks, happy camper.
[share title=”If you found this informative, Please to use the links below to share this article” twitter=”true” facebook=”true” pinterest=”true” email=”true”]