
You’ve found the perfect camping spot. It’s shaded, plenty of space between you and your neighbor and has that delightful wooded seclusion feel to it. Only problem is that pesky incline. What do you do?
You can shove just about anything under your RV’s tires to level it out, but some choices are much better than others. Read on to find the best options for leveling your RV and what steps to follow to get it right every time.
So you’ve heard the rumors and know that you’ll probably need leveling blocks. But how do you know which ones will work? And how in the world do you use them?! Have no fear, it’s easier than you might think, and I have a few suggestions when it comes to finding the right ones.
Why is Leveling Needed?
Maybe you’re wondering if you even need to worry about leveling your RV. Well unless you’re fancy-schmancy and have one of those handy-dandy buttons that says “Level” on it, then this article is for you. In fact, just in case that button breaks, you should probably know how to handle this the rugged way too.
Leveling is important because it keeps your RV level. Ok, ok sorry I couldn’t resist. But seriously, many of your appliances are designed to only work correctly when level. You don’t want that cake to bake unevenly do you? Also think about sleeping at a slant. No one likes that. (Falling dreams anyone?) So for everything to run smoothly and for you to sleep soundly, you’ll want to take the extra time to get things good and even.
What to Use
Ok, so there are a few options out there when it comes to leveling blocks. After reading quite a few articles and reviews, I would say the RV community is wholly divided on this topic. Haha! But here’s a quick breakdown of what I’ve found:
- Wood Blocks
- RV Leveling Blocks
- Barn Stall Mats
Wood Blocks
Pros
These things are cheap and sometimes even free if you’re a scavenger. You can use 2×10 pieces or 1×6, whatever seems big enough to fit under your tires. The fact that wood is inexpensive also makes it easy to replace them, and you won’t lose sleep over a broken piece of wood that you basically paid nothing for.
Cons
It’s wood. So it can rot, split, break, etc. It does the job for giving you height, but it is not high-ranking when it comes to durability. If you choose this route, you will just need to make sure you always have extra blocks on hand. Another con is that they don’t always seem to hold in place. They easily slip when trying to drive back onto them, making the task of leveling a bit tricky.
RV Leveling Blocks

I like the Lynx Leveling Blocks. They come with a nylon storage bag and they have several accessories like chocks and caps that make them quite versatile. Here’s a link to check them out on Amazon.
Pros
This is a product designed for RV leveling. The blocks are like large, square, plastic legos that can be linked together to create a type of ramp. This makes it easier to reverse onto and seems to stay in place better than wood.
Cons
Probably the biggest con is the cost. You can find them in packs of 10 for around $40. But these are not unbreakable either. Many users have experienced them chipping or breaking as well. Because of this, they become an even more expensive option because you do have to keep buying them to replace your broken ones.
Barn Stall Mats
I know, sounds weird. But hear me out! This last method just happened to be a lucky find. I found an avid RV’er who’s tried the first 2 leveling options and came up wanting. He decided to take these 4’x6’ rubber mats that come in 3/4’’ thick and cut them into 36 blocks (measuring 8”x12” each). So let’s look at the pros and cons:
Pros
Well 1 mat is around $40, but gives you 36 blocks. The durability of these suckers puts the other blocks to shame. They’re made of rubber! They easily stack and can be arranged in a ramp-like set up as well. Much easier to back the RV up onto than wood blocks.
Cons
Really the only con I could come up with here is that you have to make the blocks before you can use this method. The mats can be cut with a utility knife or probably any type of saw you might have lying around. So it does take a little time initially to measure and cut them up. But when you’re done, you have a whole bunch of leveling blocks that will basically last forever! Can you tell I’m a fan of these?!
RV Leveling Equipment
Alright, We have one last thing to talk about before the leveling process. That’s what you use to check how level you RV is. You have a couple options for doing this.
- Use a portable ”torpedo” style level
- Use levels that are permanently attached to you RV
Portable Level
If you choose the portable level method, there are 3 great places to position the level.
- On the kitchen counter of your camper
- On the floor near the middle of your camper
- On the frame of the RV near the hitch
While the frame is the most convenient place, it might not be the best. I like using the kitchen counter because this is where you will probably notice it the most if you aren’t level.
When using a portable level you will have to position it facing across the width of the camper to check side to side level, this is there the leveling blocks come in. Then you position it length wise to check front to back.
Stick on RV levels
These are great because once they are stuck in place you never have to go looking for a level while setting up camp. They usually come in a set of 2 like this Hopkins set.
You will want to stick 1 to the front of your RV and 1 on the side. I located both in the front driver’s side corner when I had my Shamrock Hybrid.
Before you stick them on you need to get your camper perfectly level using a portable level. Then you can attach the stick on RV levels with the bubble right in the center.
Using a bubble level to level you RV – 101
If you haven’t used a level much, you’re looking for the bubble to be smack in the middle. If the bubble is to the right of center, you will need to put your leveling blocks on the left side of the rig.
Likewise if it is to the left of center, your blocks will go on the right side.
Just think opposite!
Also, the further the bubble is from the center, the more blocks you will need for height.
I figured the most helpful way to approach this is just a simple step-by-step. So here we go!
RV Leveling Steps
- Pick your spot, pull through or back in and put it in park. DO NOT DISCONNECT.
- Check clearance for Slide Outs between trees, power posts and water connections.
- Place portable level width ways or check your level on the front of your RV. This will tell you which side needs to come up. Some of this will just take practice to know how to gauge the number of blocks needed depending on how far off the level is.
- Mark where your tires are on the side that you will be placing the leveling blocks.
- Pull forward a few feet and place blocks where you marked your tires.
- Back up onto blocks and check to make sure they are in place correctly.
- Check level on front again, and adjust as needed, repeating steps 4-6.
- When you feel good about placement, place a wheel chock in front of your tires that are on the leveling blocks. This will help prevent any rolling forward once you disconnect.
- Disconnect RV and check your side level now to see about your front to back balance. Using portable level placed length ways, or stick on level on the side of you camper. This time if the bubble is towards the rear of your RV, you will want to raise the front. If the bubble is closer to the front, you will want to lower your jack.
- Use your tongue jack now to raise or lower the RV until level. (This is the easiest part)
And you’re done! That wasn’t so bad, was it? Probably the hardest part is the backing up onto the blocks. This requires a steady driver who is comfortable with reversing a trailer in a straight line. But to prevent extra work, make sure you only pull forward a few feet so that going back is a cinch.
Slide Out Debate – Before or After Leveling
Some people suggest that you pop out any “Slide Outs” you may have on your RV before leveling side to side. The thought is that slide outs will affect the balance and should be done before you start leveling out your rig.
I will leave this up to you, I find it risky to move your RV with the slides out. You could try leveling with them in and then check after opening everything up to see if it makes a difference.
A Few Things to Keep In Mind
Stabilizing is NOT Leveling
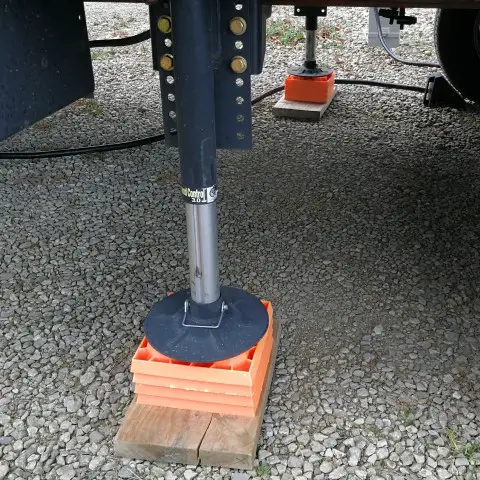
Most RVs come with stabilizing jacks and unfortunately, many people attempt to use those for leveling. The purpose of those stabilizers is just that–to stabilize. Basically once you have the RV leveled, then you can put down the stabilizers as reinforcement. These jacks were not made to do the heavy lifting or lowering and in many cases it will damage them if you try to use them for that. So be sure to follow the steps listed above before dropping those metal feet.
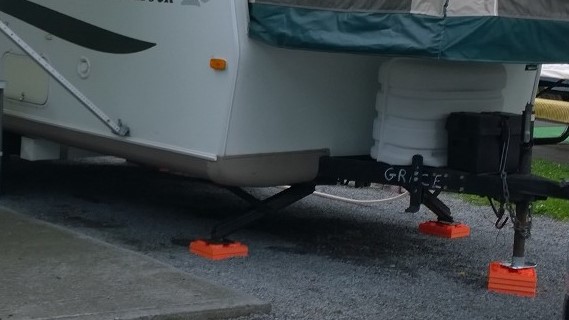
Using leveling blocks under your camper’s stabilizers is a good idea to help stiffen things up. The shorter you can keep the stabilizer jacks the better they work, so bring a few extra blocks to uses there too.
Click Here to check out this article if you are looking for more tips to stabilize you RV.
Are All Levels Created Equal?
Pretty much! Maybe you’re realizing you don’t have levels already stuck to the outside of your RV. That’s ok! It’s not absolutely necessary that you have them installed. I will say, it does make it easier if they are on the outside just for quickly being able to check while you’re hopping in and out of the truck. These can be purchased at RV stores or online. Again this set I used is a low cost option that gets the job done.
However, you can also just use a regular old level you have sitting in your garage. Throw that in the RV and use it on the floor of your rig to check your balance.
One way to check you level is to place it on a surface and check the position of the bubble, then pick it up and rotate it 180 degrees. If the bubble is in the same position the level is good, if the bubble changes position then you level probably needs replaced.
Either way, just make sure you are using a legit level. I think it goes without saying, but eyeballing it is not going to do the trick here.
Tire Coverage
So, the last thing worth mentioning relates to making sure you have adequate coverage under your tires. A rookie mistake is not covering your tire tread completely with leveling blocks. When you pull forward after marking your spot, try to lay out your blocks over the entire footprint, length and width. Putting your RV tires only halfway on your blocks might achieve the height you want, but will definitely damage your tires. So when you’re checking your placement, be sure to do a quick tire check as well, that there are blocks completely underneath all tire tread.
Wrap Up
And that’s about it! Obviously not all RVs have the same set up, so you may need to make adjustments to the list. But in general you will need to at least choose what type of leveling blocks you want to use. And maybe it will be trial and error at first, but hopefully my suggestions will help you eliminate that step.
Don’t forget your levels, check that tire coverage and only use those stabilizers once you’re completely done and you will be good to go!
Thanks for reading and remember to share this post on your favorite social media to help others out too.