
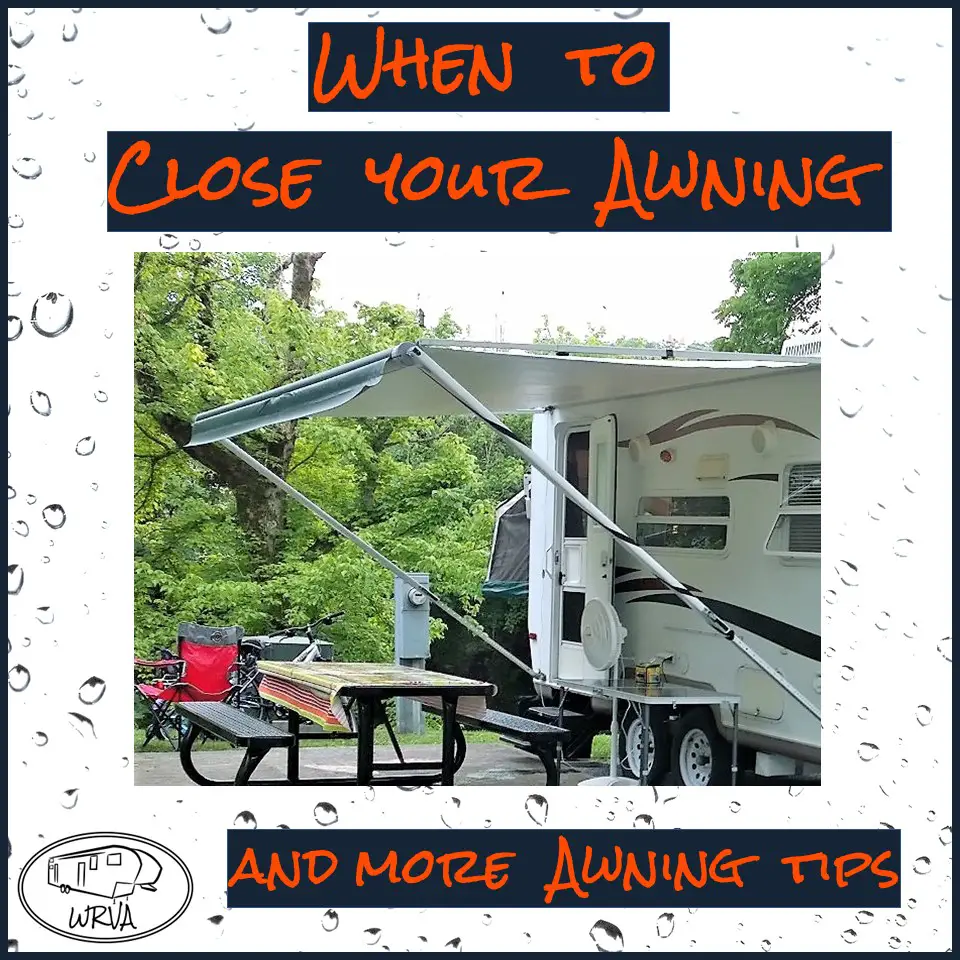
Can you keep your RV awning out during rain? (and more awning tips)
RV awnings are great, they block the sun and keep us cool on a hot day. They give us a place to get out of the rain and keep our gear dry. They are also a source of confusion and debate between many RV owners. Some RV’ers have very strong feelings on awning use and when they should be retracted.
Let me state right from the start, these recommendations are not from any awning manufacturer, unless specifically indicated. The opinions are my own and opinions others have shared on blogs and forums.
Please do what you feel is safe for you and your RV.
One simple, but hard to answer question is Can you keep your RV awning out during rain?
Some other common variations sound like this:
- Should I close my awning when I leave camp?
- Should I close my awning at night?
- Do I need to retract my awning if it rains?
- Can I leave my awning out if I use awning tiedowns?
Let’s start with a more basic question. When should I retract my RV’s awning? After we answer that question I’ll look at tiedowns and other awning accessories.
If you read to the end, I have a few other tips to keep your awning in great shape and enhance its use.
When to Close your Awning
Here are the rules I follow with my own awning.
When at camp
- Heavy rain
- If you see water creating a sag in the awning
- If wind is blowing up the awning or causing the arms to move
At night or when leaving camp
Any time there is a chance of heavy rain or wind.
Why I follow these rules, and how they might be different for you
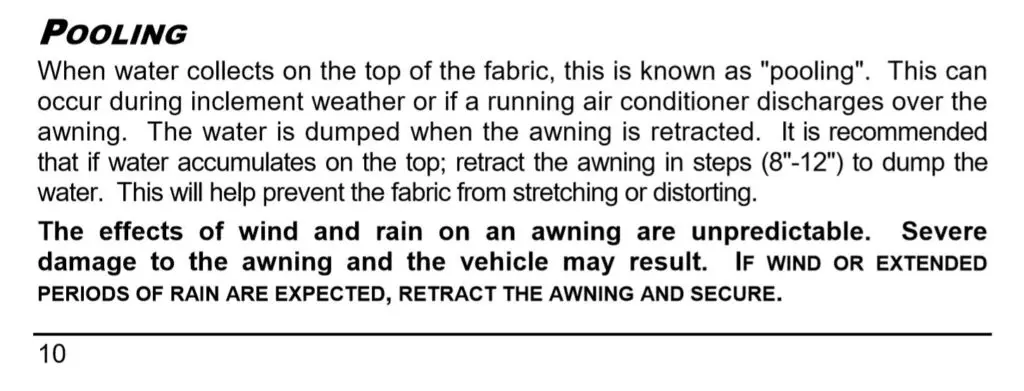
The purpose of an awning is to provide protection from sun and rain. This means you shouldn’t have to retract your awning at the first hint of rain cloud. One thing awnings are not designed for is wind, another is water pooling on the awning. Some awnings have been designed to stop water from pooling and to protect themselves from wind while others require you to do something. Here is a quick breakdown of the most common types of awnings and what you can do.
Manual Awnings

How they work
This style awning has a long tube across the top of the RV and 2 arms that connect from the tube to a hinge near the bottom of the camper. They usually have a switch on the tube that is flipped to pull the awning out. Once the awning is rolled out 2 tension arms slide up and lock into place forming a triangle between the camper and the awning. At this point the awning is very low and probably blocking the door from opening. The last step is to extend the arms to raise the awning.
How they perform
Manual awnings can be set anywhere from a flat position to the initial position with a very steep slope. This is great for allowing rain water to run off. When the weather is dry they can be set flat, but if it starts to rain, simply lower one or both sides and the water is deflected where you want it. If you set enough slope you shouldn’t have a problem with water pooling on the fabric.
Because of the large triangle formed by the awning frame this type is quite strong. That can be a problem in heavy winds because the awing acts like a large kite catching the wind and pulling on the RV. I have seen the entire awning ripped right of the side of a camper before. So, if the winds are picking up you should retract a manual awning right away.
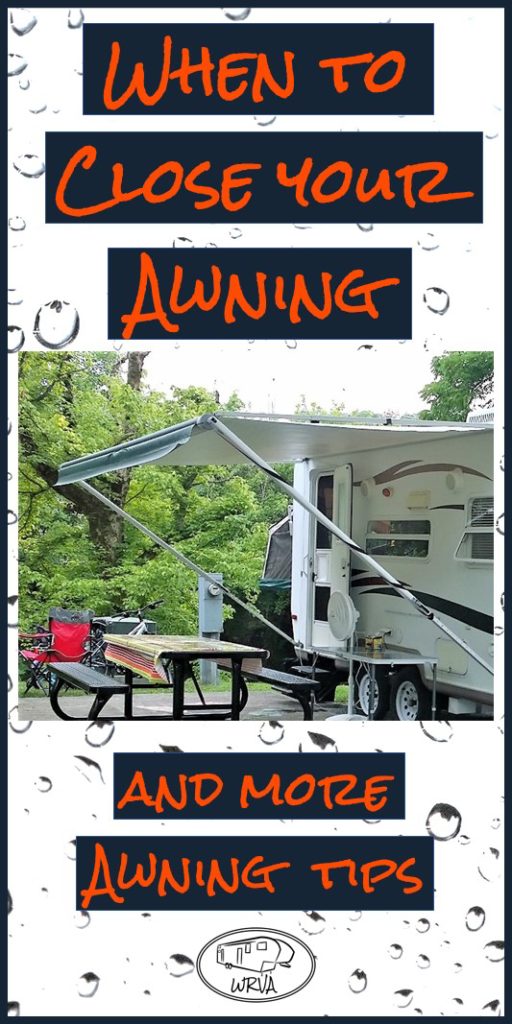
Power Awnings with Vertical Arms
How they work
Like a manual awning these have a large tube that the awning rolls up on that extends out from the top of the RV. The also have arms extending down the side of the trailer, but usually they are shorter than a manual awning and may have more of scissor type design. You open and close this type of awning with a switch in the camper.
How they perform
These also usually have an adjustment to change the pitch allowing for water to easily run off. If your awning doesn’t have a pitch adjustment you should bring it in with any steady rain. Models like the Lippert Solara awning will also automatically pitch down from the weight of water pooling on them. My awning has this feature, but I still manually lower it if it starts to rain.
When it comes to wind this type is more flexible than a manual awning so the entire frame on many awnings of this style will move up and down if it catches some wind. Some also have wind sensors that will automatically retract the awning if it starts moving. This does help prevent damage to the RV, but again I would rather bring it in and know I am safe, than count on the automatic feature.
solara power awning flat 
solara power awning sloped
Power Awnings with Horizontal Arms
How they work
These awnings can be identified easily because the do not have any attachments to the side of the RV. They are completely housed across the top. Unlike the other styles, the tube stays in place and the awning is pulled out with a “bar”. This type of awning is the most expensive and is usually found on high end travel trailers, 5th wheels, and motorhomes.
How they perform
This style awning has no pitch adjustment. Even light rains if the last long enough can cause water to pool between the support arms.
Most awnings of this type have wind sensors to retract automatically. The horizontal arm design, is in my opinion, the weakest and should be retracted any time there is wind.
I was camping with a friend last summer and his horizontal arm awning failed. He had a new motor home with a carefree awning. The awning was equipped with wind sensors and they had retracted the awning once that weekend so we knew it was working. One night he went to bed with the awning out and is started raining. He woke up to a loud crashing sound and then heard the awning trying to retract. The rain had pooled until the arm of the awning snapped. The sudden movement set off the wind sensor and initiated the auto retract. By the time he stopped the awning from retracting the broken arm had already ripped a large hole into the fabric. Along with some other friends, we spent about 1-1/2 hours the next morning trying to roll the awning up so he would be able to drive home. In the end he filed an insurance claim and the entire awning was replaced.
So, with that said, I would suggest retracting this style awning any time you even think there might be a chance of rain or wind.
What about only leaving the awning extended a couple of feet?
With manual awnings this isn’t possible, but most power awnings can be stopped at any point. If your goal is to provide a little bit of coverage over your door I would say go for it. If you are going away or going to bed at night. I would bring it in all the way. A partially extended awning won’t have much pitch and could easily begin pooling water, so if you can’t keep an eye on it, bring it in.
5 Free Checklists
Enter you email below for access to 5 free checklists for you next trip.
Awning Stabilizers (tiedowns, bows, and more)
There are all kinds of products available that are supposed to stiffen, stabilize, or keep your awning from flapping.
These products have their place and can be good in the right situation, but mostly I recommend avoiding them. I have 2 reasons for that recommendation.
- They take longer to setup
- When weather gets really bad they still need to removed and the awning should be retracted.
Tiedowns
These are straps that connect to the ends of your awning and then are staked to the ground. They do a great job holding the frame in place.

Pros:
Easy to install. In light wind they could allow you to leave your awning out. They can also be used to add a little tension to your awning helping water to run off and prevent pooling.
Cons:
In heavy winds they make the awning less forgiving like pulling a sail into the wind they will increase the force on your RV making it more likely to damage something.

Do not use tiedowns on power awnings. They can only be used on awnings with a rigid support arm that connects from the end of the awning to either the ground, or low on the camper.
Bows
This category includes products like the Carefree Awning Rafter and the Lippert Solara Awnbrella. These products install between the awning tube and the wall of the RV and serve 2 purposes. They tension the awning and pitch the awning.

Pros:
These bows stiffen your awning making it more resistant to wind. They also help to prevent water from pooling making it safer to leave out in heavier rain.
Cons:
They are more expensive and time consuming to install and remove than some of the other products. You will probably need a ladder (or a picnic table) to reach the awning to install them. Again, in heavy winds they should be removed, and the awning should be retracted.
De-flappers
This category includes products like the Camco Awning De-Flapper Max. They clip onto the side of your awning fabric and then hook around the awning support arm to tighten the fabric from the sides. Most power awnings do not have support arms along the sides, so these can only be used with a manual awning.

Pros:
- Inexpensive
- Prevent flapping on older, stretched out awnings.
Cons:
- Don’t help much for wind or rain
- Need ladder (or picnic table) to reach awning to install and remove
- Must be removed to retract awning
Seasonal and Semi-Permeant Campers who don’t want to retract their awning
I don’t fall into this category, but if I did and I wanted to keep my awning up all season this is how I would do it. If your camper is in an area with high winds, then don’t consider this option.
With a manual awning, you can detach the lower end of the arm from your RV and stake it to the ground. This combined with tiedowns to hold the arm secure and awning bows to keep water from pooling would be the best possible solution.
Other Awning tips
Here are a few other tips to help keep you trailer’s awning in great shape and get the most enjoyment from it.
1. Packing up a wet awning
Moisture and a rolled up awning are a bad combination. We have all been stuck packing up camp in the rain, but once you get back home, or to your next destination get that awning open as soon as possible. Water trapped in a rolled up awning is the perfect place for mold and mildew to grow. You might think a day or 2 won’t hurt, but if you don’t get that awning opened up right away you could be in for an unpleasant surprise. If that happens you my next tip is just what you need.
2. Cleaning your awning
Awnings block the sun and rain, but they also catch leaves, bugs, tree sap, pollen, and all kinds of other things that make a mess. Keeping your awning clean starts before you roll it up to leave camp. I always take a broom and hit the underside of the awning to knock as much debris off as possible before rolling it up. If you can reach the top, go ahead and wipe that with the broom too. I use the Camco folding RV Broom, it works great because you can rotate the broom head making it easier to reach up to the top.
Washing your awning a couple times a season will help to prevent stains and keep your awning looking good. When washing my awning I mix a solution of a couple squirts of Dawn dish soap and water in a 2-gallon yard sprayer. That makes it easy to spray without soaking yourself. Here’s the process I use
- Spray the entire surface of the awning with the solution.
- Next roll up the awning and let it set for about 15 minutes (this applies the solution to the top of the awning).
- Unroll the awning and rinse with water.
- Look for any areas that didn’t come clean, if you find them apply the solution again.
- Roll up the awning for another 10-15 minutes.
- Unroll and using a broom or long handled brush go over the areas that didn’t come clean the first time.
- Rinse again, make sure to get the top too.
- Allow the awning to completely dry before rolling back up.
Removing mold, mildew, and stains
If the process above doesn’t get your awning clean, or if you let mold and mildew start growing you are going to need something a little stronger to get it clean. For this I still follow the same process, but the cleaning solution is a little different. I recommend using the yard sprayer for this too, but to be safe you should wear eye protection while spraying the solution.
Caution:
When using this solution, don’t leave it on for more than 15 minutes before rinsing because long term exposure to bleach could cause damage to your awning or its stitching. Also, for canvas awnings test a small hard to see are to make sure you will not bleach the color out of your awning.
Awning Mold, Mildew, and Stain Remover
- ½ cup bleach
- 4 sqirts Dawn dish soap
- 2 gallons water
If you don’t want to make your own cleaner or don’t want to use bleach a commercially available cleaner like Star brite mildew and stain remover works well too. Star brite is designed for marine use, so it works great on tough mildew stains.
3. How to Protect Your Awning
You might not think your awning needs protection when not in use but depending on where you live the Sun could damage your awning causing it to crack and need replaced. This is a bigger problem if you live in the south where the sun shines a little more than where I’m from in Ohio.
You can spend hundreds of dollars on expensive awning protectors, but I recommend a simple DIY solution that will only cost you about $20. This video from YouTube Explains how to make and install your own awning cover. Keep in mind this should only be used while in storage and must be removed before traveling.
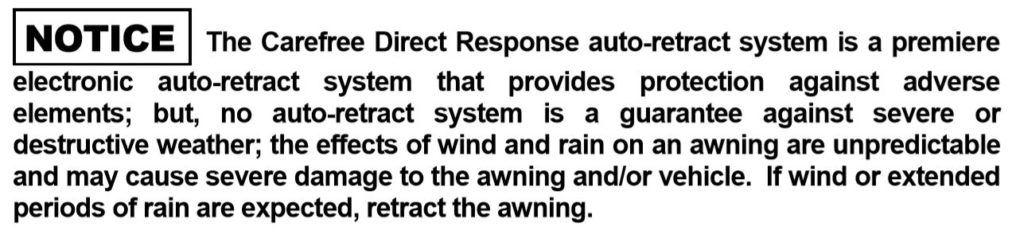
4. Awning Lights (a better way)
With most of today’s RV’s coming with LED lights installed below the awning the traditional string of colorful lights is becoming less common. Personally, I don’t like the string of lights off the end of my awning because they must be taken down to roll the awning up. If your camper doesn’t have an awning light I have 2 solutions to recommend that will brighten up your patio area and still allow you to retract your awning quickly.
Solution 1: Install you own Awning LED light Strip
My previous RV a 2007 Shamrock, had a manual awning without lights. While walking through Camping World I saw an LED Awning Light Kit for over $100. I loved the idea, but hated the price, so I got home and started looking on Amazon. I found that you can buy the same LED light strip for under $20! The kit comes with a power supply that connects to a 110V outlet, a small control box, remote control, and a 16.4 ft strip of multicolored LEDs with an adhesive back. I also purchased an extension cable.
I opened my awning and stuck the strip to the awning tube pointed slightly back toward the camper. This did a great job of illuminating the patio area and washing the camper in whatever color my kids set the lights to. After 1 season the some of the LEDs did fail, I believe from the abuse of the awning rolling up on them and bouncing while driving down the road. The next season I replaced the strip with a new one that I suck to the wall of the camper just below the awning. This position shined light further out away from the camper. It lasted several seasons and was still working when I traded the camper in.
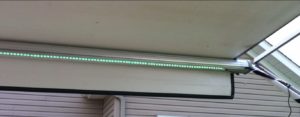
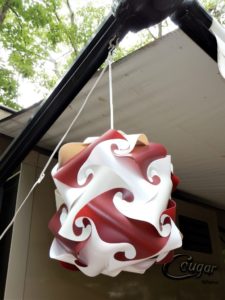
Solution 2: Hang lights from the awning arms
The Cougar 5th wheel I camp in now has an LED strip below the awning, but we found some really cool lights at the RV show in Hershey, PA so I needed a way to hang them. I wanted to be able to hang the lights and still retract the awning if bad weather came along so I built my own brackets.
I made 2 small stainless steel hooks that attach to the mounting bolts of my Solara Power Awning. Even with the lights hanging I can retract the awning in bad weather.
If you are interested in getting a set of these hooks leave a comment below or used the contact page. If I have enough interest I will make some more.
hanging awning light 
stainless-steel light hook for solara awning
Wrap Up
If you found any of these tips useful please help me out by pinning this to your camping board on Pinterest.
If you’re looking for more camping tips, here are over 100 RV tips covering everything from towing to sewer connections.
Thanks for reading and enjoy your next weekend RV adventure,
Jason
Share this Post
lower one end of awning to prevent pool of water
Hi Kevin, Thanks for sharing. That is definitely good advice.
Jason
I have a brand new awning on my Mallard M29 and we rolled it up not knowing there was pollen on the top (we are new at this) and now I have yellow pollen stains all over the underside of my new awning. What can I use to get it off?! (it is an electric awning and i believe it is vinyl).
I would start with some water and dawn dish soap. Dawn won’t damage the vinyl, but is a powerful cleaner. If that doesn’t work try purple power, but don’t leave it on too long because it’s much more powerful. With either cleaner, get it soaped up and then roll the awning up for a minute or two to get everything covered, then scrub it with a long handled car brush or broom and rinse it off.
Thanks, Jason
Jason,
I enjoyed the information you have discussed in this article for campers to protect these awnings from wind and rain – springs, tie downs and bows. However you did not mention the latest approach of protection – awning support poles. I have used these poles for several years and find them very suited for the job. In fact, one of my friends boasts that she puts her awning up in the spring and does not take it down until camping ends. They are available on E-Bay and Craig’s list. If your readings find these poles fo interest, have them e-mail me at rmoser@ysu.edu.
Thanks for this important information.
Russell, Thanks for sharing your experience. Awning support poles are another option. They do provide more support than many of the other accessories, but I do still have concerns with wind gusts possibly causing damage where the awning attaches to the RV. I’m glad to hear that they have worked well for you and your friends.
Jason
Thanks for clearing this up Jason. I have a 2014 rv and love sitting outside with awning extracted when it rains. I have had many discussions with my Rv neighbor condemning me for leaving my awning out in the rain. However I have noticed during heavier rain the left side of awning retracts automatically to clean the rain off when it starts getting heavy then retracts to bring it back to the original set.
Is this damaging my automated retractors ir not. Thank you for your help..Sharon
Sharon,
I also enjoy sitting out when it’s raining. If your awning automatically dumps the water then you should be fine, but you still have to watch out if the wind picks up.
To be on the safe side I would still retract the awning when you aren’t around to keep an eye on it.
Thanks for reading and leaving your question,
Jason
The advices that how awning should be taken care are really helpful, thanks and keep sharing.
Thanks,
Jason
Great advice all around, and the questions/comments are good, too.
It’s been raining heavily all day in east Texas and (of course) my dog needed to go outside. I extended the power awning, she felt safer with the protection = success!, so once back inside I did a search on leaving it extended in the rain.
Found you and your suggestions. I went ahead and retracted it but will DEFINITELY clean it and let it dry really well soon as we get sun again. I’ll try the DIY with Dawn – my personal favorite – to clean, but have never heard of Purple Power. I’ll pick some up for future use; there will always be something needing heavy-duty cleaning around here.
My question is: how long can an awning be rain-soaked before it starts to mold/mildew or become damaged? It looks pretty sturdy, is black (thank goodness) vinyl or other non-canvas material, and seems really thick.
I’ve only been RVing about 2 months, so thank you for your RV blog!
Lacey,
It is probably fine to leave for a day or 2, but after about a week in hot weather it will probably start molding.
Thanks,
Jason
Question. When I retract my Solera power awning I see a lot of water draining from the housing at the end of the roller arms one which houses the motor. Is the motor protected from that water?
Yes, the motor should be fine.
I want to replace the vinyl awning material on my carefree of Colorado motorized awning. I’m looking at Carefree, Dometic, and Solera 13.5 oz vinyl material. What is the difference in qualities between these brands? Ayn recommendations? The Solara is a little cheaper at this time.
Richard,
I wish I could help you out on this one, but I really don’t know which brand makes a better vinyl.
Jason
Great article! I always had a manual awning until this new trailer which came with an electric one that makes me nervous lol. I just wanted to let you know that you can actually have a manual awning out only a few feet. I used to do it all the time. You just put it out the distance of the support arm without extending it at all. It makes a nice small porch.
Thanks for the information.
Jason
Some good info in your post I can put to good use for my future
plans. Thank you for taking the time to publish
this, I am certain this can help numerous others as it has helped me personally.