
If you are looking for a convenient, low cost way to store your sewer hose, this DIY RV sewer hose storage solution is my favorite. With this solution you don’t have to worry about losing one of those rubber bumper caps, or reaching up in that nasty bumper or storage tube to get your hose out anymore.
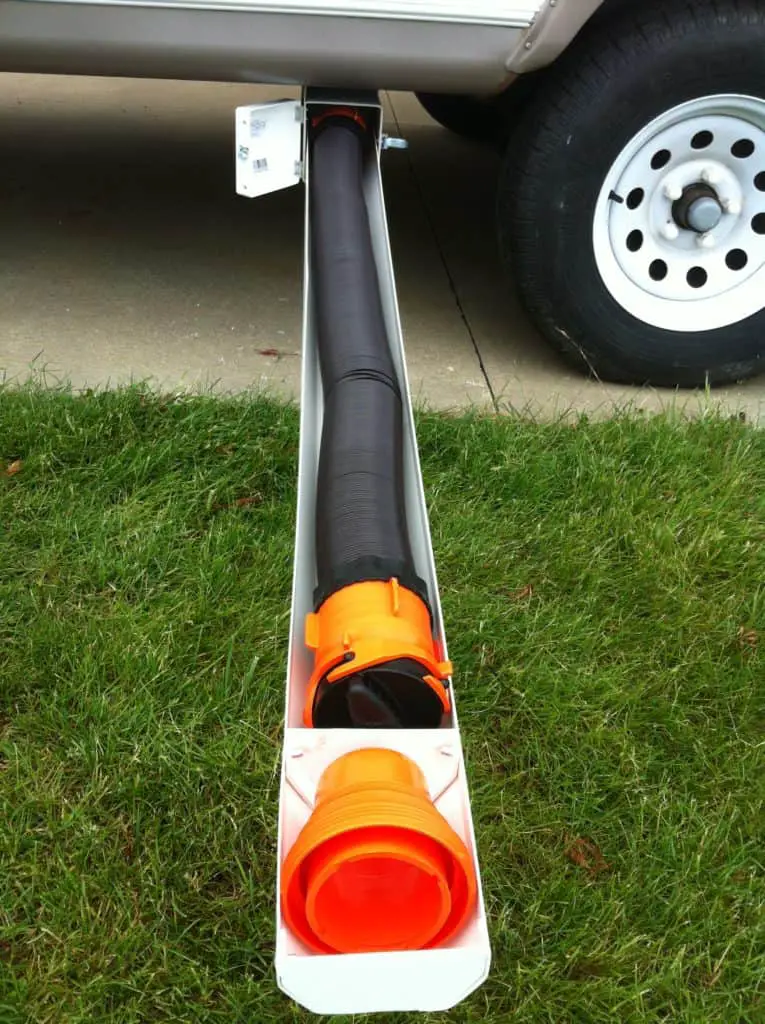
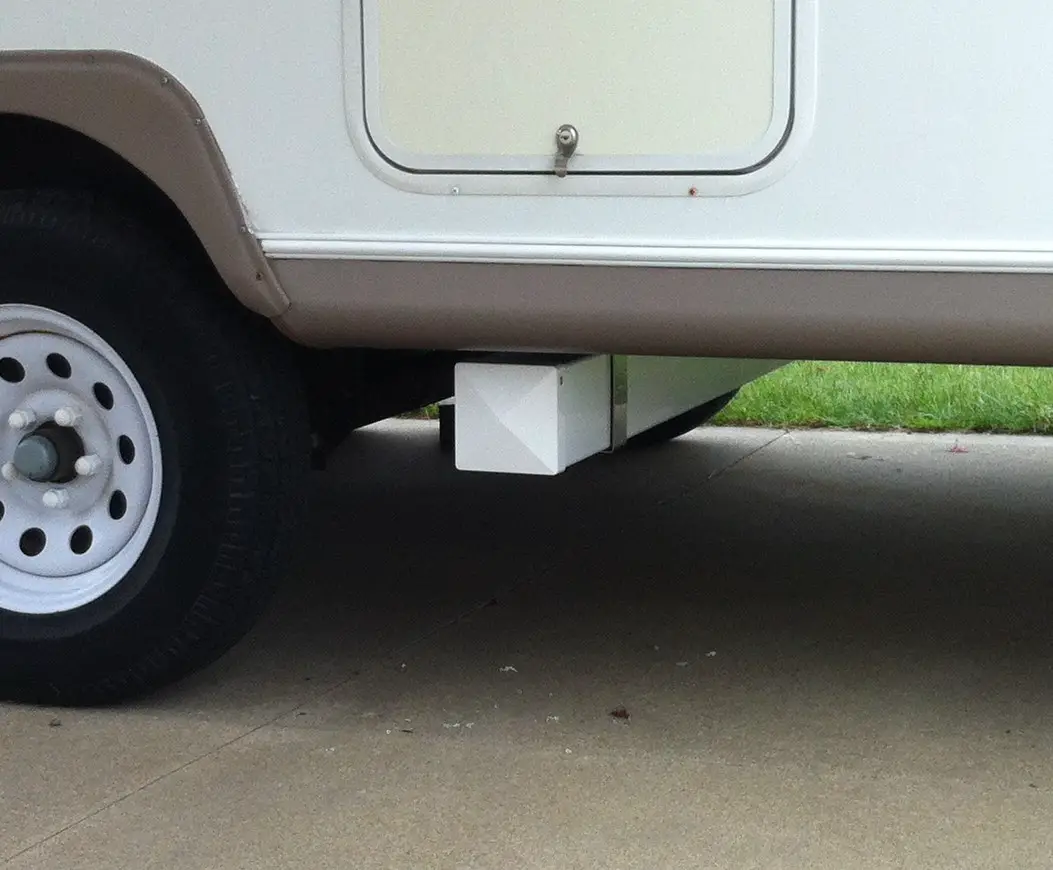
The sewer hose is stored conveniently below your RV on a tray that slides out to access you hose and adapters. Located near the dump valves and sewer outlet. The basic design consists of vinyl fence post, caps, hinges, a latch and a vinyl rain gutter. Because everything is made of vinyl it will last a long time, will never rust and can be easily hosed off when needed.
Time to Complete?
1 weekend afternoon
Cost?
Less than $75
Required Materials
- 5” x 5” x 8’ vinyl fence post, 1 piece
- 5” x 5” vinyl post cap, 2 pieces
- 4.5” half round vinyl rain gutter 10’ long, 1 piece
- 4.5” half round vinyl rain gutter end cap, 3 pieces
- 1” x 1” zinc plated door hinge, 2 pieces
- Zinc plated draw latch (about 2.5” long), 1 piece
- 1.25” wide foam rubber weatherstrip, 1pack
- 1-3/8” x 0.075” thick x 6’ plated steel slotted metal bar, 1 piece
- #8 x 0.75” Zinc-Plated Self-Drilling Interior/Exterior Sheet Metal Screws, 4 pieces
Required Tools
- Pencil
- Tape measure
- Hack saw or cutoff saw
- Plyers
- Drill and bits
- Rivet gun with aluminum rivets
Construction
- Look under your RV and pick a location to mount the fence post. Make sure there are frame rails to attach the straps at each end. Also make sure there isn’t anything sticking down where you plan to mount the post.
- Measure the width under your RV where you plan to mount post, remember you do not have to go all the way across as long as you have mounting locations near each end. Cut the fence post to the width measured.
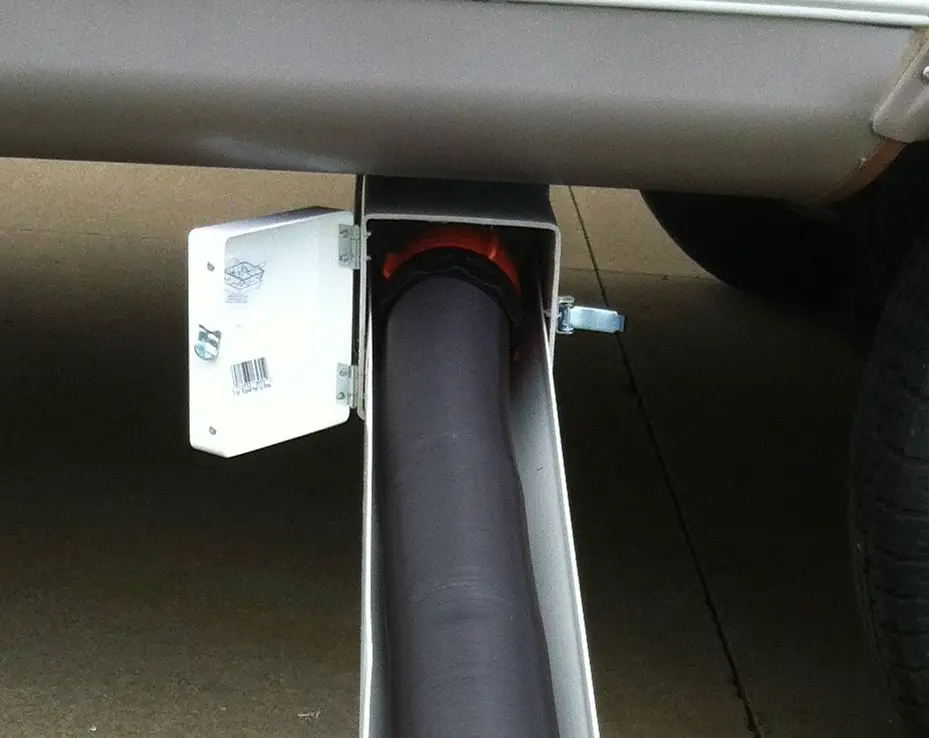
- Slide a post cap on to one end of the post. Drill 2 holes for a rivet on opposite sides of the cap and install the rivets.
- On the opposite end of the post decide which way you would like to door to swing, then install the second cap sliding it a little less than ½ way on to the post. This will allow it to swing open.
- Slide the 2 hinges between the cap and post. Mark the hole locations on the post with a pencil.
- Remove the hinges and cap and drill holes for the rivets where your marks are.
- Install both hinges with rivets.
- Now slide the cap back on over the hinges and test the opening and closing on the door. If the door gets stuck slide it out a little further so it swings open easily. Once you determine the proper location mark the holes, drill and attach the door with rivets.
- On the side opposite from the hinges line up the draw latch on the center of the post and attach it with rivets.
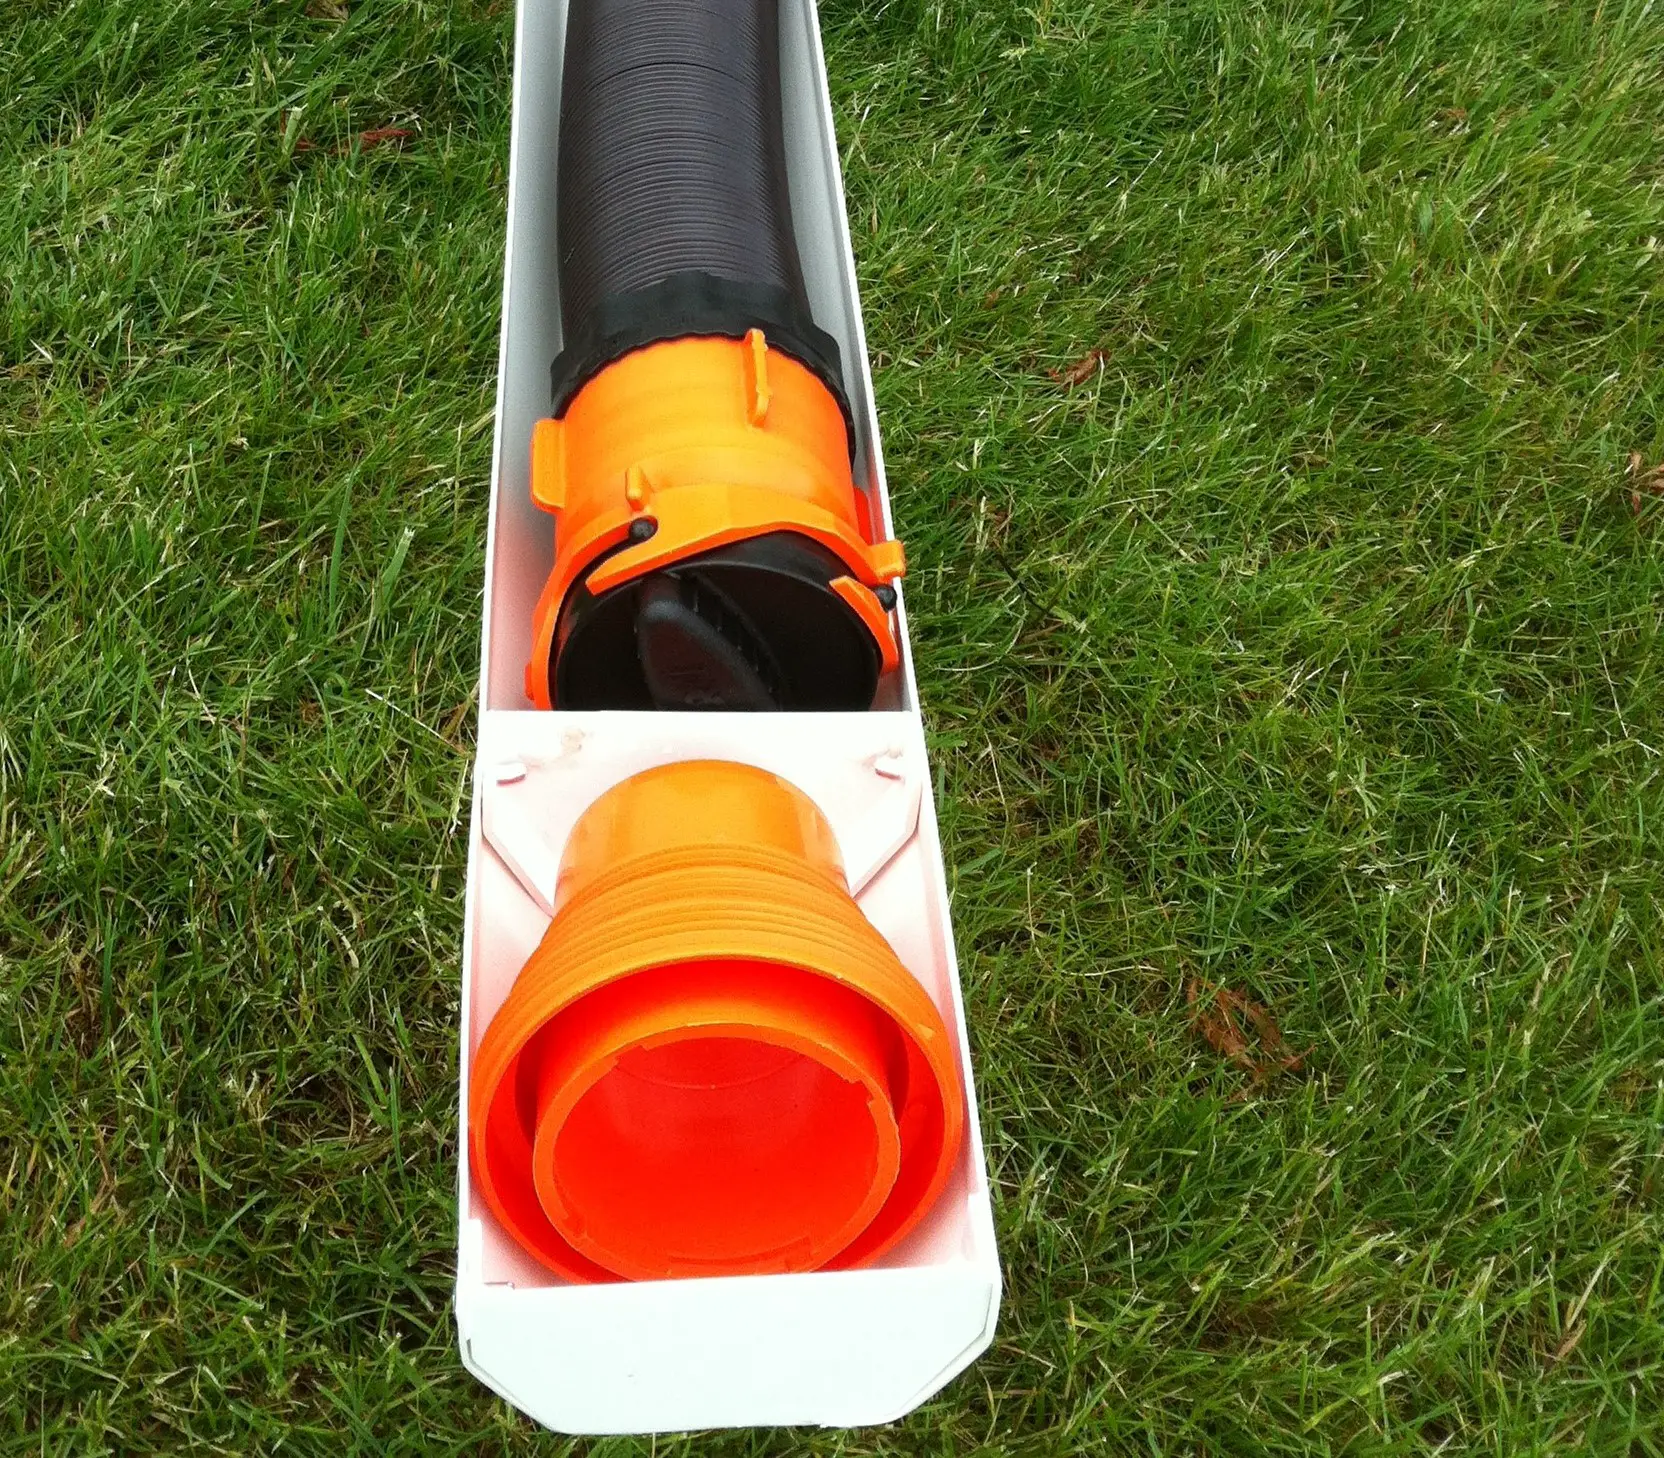
- Attach a cap to one end of the rain gutter using 3 rivets. 1 on the each side at the top and 1 at the bottom make sure to insert the rivets so the smooth head in on the outside of the gutter.
- Slide the gutter into the post until it hits the fixed end cap and make a mark about ½” inch inside the post. Remove the gutter and cut it at the mark.
- Install a cap at the open end of the gutter and then 1 more in far enough to hold your hose adapter and anything else you would like to prevent from sliding around. Just make sure to leave enough room in the long section for your hose.
- Cut the metal strip into 2 pieces about 20” long
- Center the strip on the bottom of the tube and mark the sides of the post. Using 2 pairs of pliers or a vice bend the metal into the shape of a squared off U. Make the U slightly wider than the post so you can get the weather stripping between the post and the bracket.
- Place the U over the post and mark the top to create the “ear”
- Bed the ears so that they are slightly below the top of the post this way the post will be squeezed tight against the frame of the RV.
- Cut the weatherstrip to fit the inside of the brackets and stick it on each of them.
- Measure the distance from the end of where the post will be to your mounting locations, then slide the brackets over the post at those positions.
- Get someone to help you hold the post under the RV and transfer the hole locations in the bracket to the frame
- After all the hole locations are marked attach the post with the self tapping screws.
That’s it your DIY RV Sewer Hose Storage is complete!
Notes
- I had access to some stainless steel sheet metal that I used for the brackets, but if you do not the slotted metal bar in the materials list should be available at any big box hardware store and will be easier to work with.
- If you would like to add drainage drill a ½” hole somewhere in bottom of the post to allow water to drain out more easily.
Share this Post
What is the advantage of having the slide out tray for the hose? I don’t see the need or convenience for having one. What am I missing?
Hi, thanks for the question. In my case one advantage was that my sewer hose was much shorter than the width of the camper. With the tray I could still easily access the hose even if it slid to the opposite side. It also allowed me to divide off a section for the hose adapter. That way it always stayed in place.
You can always try it without the tray and add one later.
Thanks again,
Jason
Excellent idea, I just wish I had the energy to do it. Old man winter is knocking at the door and I wasted too much time on another pita project.
I need to do this again for my current trailer, but I think it will wait until spring.
Let me know if you get to in in the spring too.
Thanks,
Jason
Did you mean to say:
“4.5” half round vinyl rain gutter 10’ long, 1 piece”
?
I looked and all I could find was 4″ half round. And, that fit perfectly!
That being said, I followed a lot of you directions, and was successful. I made a few modifications and it works great.
Thanks for the great idea!
I don’t see a way to add pictures here, but here’s a link:
https://photos.app.goo.gl/CCwxvtKSfsuY3zNk8
Looks great!
Jason
Neil, When I did mine I think is was a 4-1/2″ gutter from Home Depot. Depending on where you were shopping for your parts they may carry something different. I’m glad you found something that worked.
Jason
Can I order just the tray that fits inside the bumper to hold the sewer hose?
Jan,
I’m not sure if the tray I used would fit in a bumper.
If you want to try it, the “tray” is a vinyl gutter from home depot.
Thanks,
Jason
This is a great idea. Nice and clean too. I mentioned your blog on my website. Here is the link: Where do you store the extra sewer hose without bringing the stinky-slinky inside. https://tinylifeconsulting.com/adding-sewer-hose-storage-to-your-rv/
Thanks for the mention.
Jason
With today’s prices on material then the time, I’ll just order this.
https://www.amazon.com/Valterra-Adjustable-A04-5094BK-Carrier-50-Black/dp/B01NA0K9YR/ref=sr_1_2?dchild=1&keywords=travel+trailer+sewer+hose+storage&qid=1621450296&sr=8-2
I really like your design and if prices were cheaper, I’d do it.
Thank you for the fantastic idea!! We had to do our a bit different and accommodate everything mounted to our bumper. Ours is mounted under it. We made our own square u bolts since we couldn’t find them long enough. Very happy with the idea and how it worked out on ours!